Swift
Getting Started
Xcode project
Create or open an existing Xcode project and install Couchbase Lite using one of the following methods.
-
Download Couchbase Lite.
-
Unzip the file and drag CouchbaseLiteSwift.framework from your Finder to the Xcode navigator.
-
Click on Project > General > Embedded Binary and add CouchbaseLiteSwift.framework to this section.
-
Import the framework and start using it in your project.
import CouchbaseLiteSwift
...
-
In your Cartfile, add the following.
Couchbase Lite Community Editionbinary "https://packages.couchbase.com/releases/couchbase-lite-ios/carthage/CouchbaseLite-Community.json" ~> 2.1.1Couchbase Lite Enterprise Editionbinary "https://packages.couchbase.com/releases/couchbase-lite-ios/carthage/CouchbaseLite-Enterprise.json" ~> 2.1.1 -
Run
carthage update --platform ios. -
Drag CouchbaseLiteSwift.framework from Carthage/Build/ to the Xcode navigator.
-
Click on Project > General > Embedded Binary and add CouchbaseLiteSwift.framework to this section.
-
In your Podfile, add the following.
Couchbase Lite Community Editiontarget 'Example' do use_frameworks! pod 'CouchbaseLite-Swift', '~> 2.1.1' endCouchbase Lite Enterprise Editiontarget 'Example' do use_frameworks! pod 'CouchbaseLite-Swift-Enterprise', '~> 2.1.1' end -
Install the pods and open the .xcworkspace file generated by Cocoapods.
pod install
Starter code
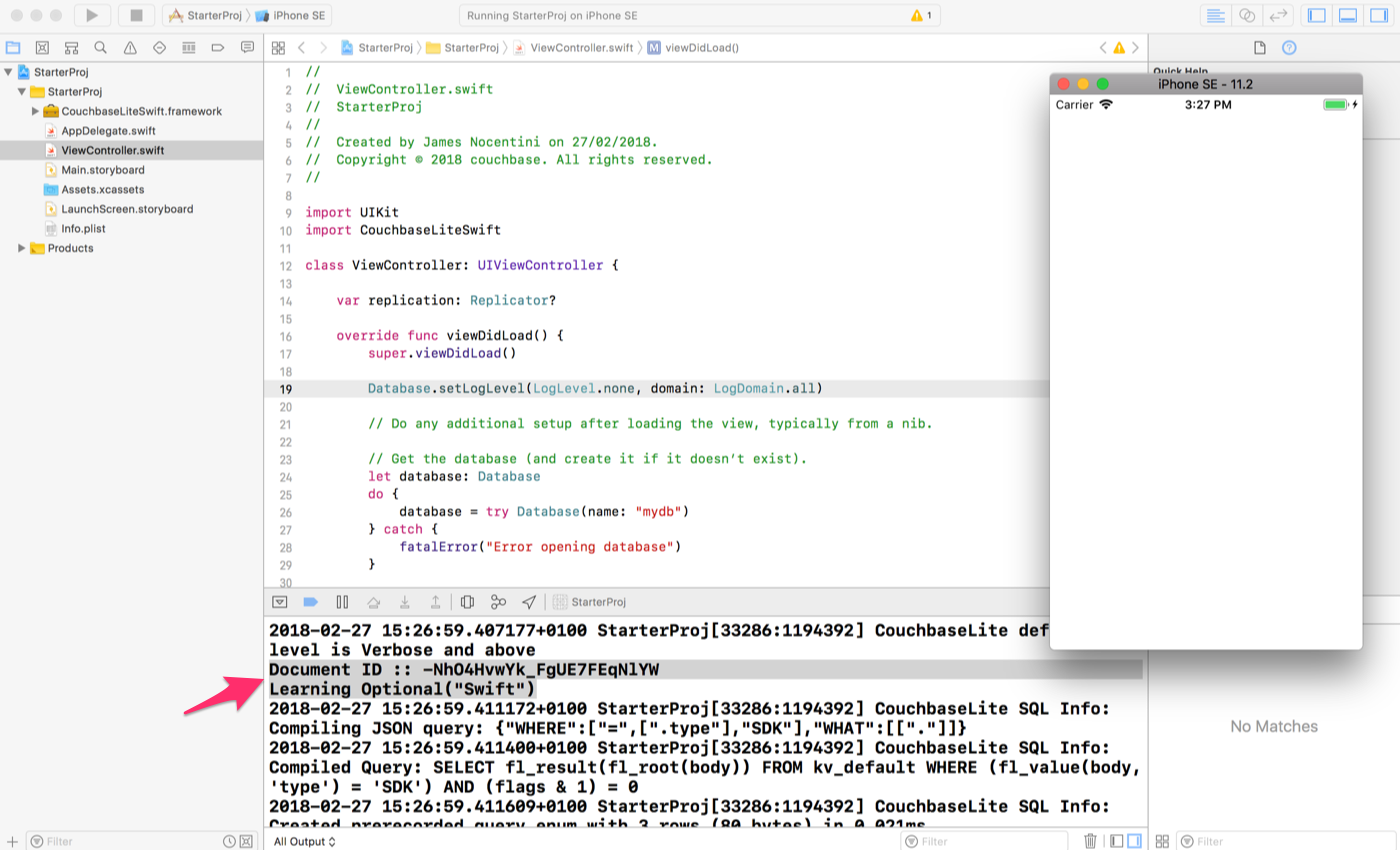
Open ViewController.swift in Xcode and copy the following code in the viewDidLoad method.
This snippet demonstrates how to run basic CRUD operations, a simple Query and running bi-directional replications with Sync Gateway.
// Get the database (and create it if it doesn’t exist).
let database: Database
do {
    database = try Database(name: "mydb")
} catch {
    fatalError("Error opening database")
}

// Create a new document (i.e. a record) in the database.
let mutableDoc = MutableDocument()
    .setFloat(2.0, forKey: "version")
    .setString("SDK", forKey: "type")

// Save it to the database.
do {
    try database.saveDocument(mutableDoc)
} catch {
    fatalError("Error saving document")
}

// Update a document.
if let mutableDoc = database.document(withID: mutableDoc.id)?.toMutable() {
    mutableDoc.setString("Swift", forKey: "language")
    do {
        try database.saveDocument(mutableDoc)

        let document = database.document(withID: mutableDoc.id)!
        // Log the document ID (generated by the database)
        // and properties
        print("Document ID :: \(document.id)")
        print("Learning \(document.string(forKey: "language")!)")
    } catch {
        fatalError("Error updating document")
    }
}

// Create a query to fetch documents of type SDK.
let query = QueryBuilder
    .select(SelectResult.all())
    .from(DataSource.database(database))
    .where(Expression.property("type").equalTo(Expression.string("SDK")))

// Run the query.
do {
    let result = try query.execute()
    print("Number of rows :: \(result.allResults().count)")
} catch {
    fatalError("Error running the query")
}

// Create replicators to push and pull changes to and from the cloud.
let targetEndpoint = URLEndpoint(url: URL(string: "ws://localhost:4984/example_sg_db")!)
let replConfig = ReplicatorConfiguration(database: database, target: targetEndpoint)
replConfig.replicatorType = .pushAndPull

// Add authentication.
replConfig.authenticator = BasicAuthenticator(username: "john", password: "pass")

// Create replicator.
let replicator = Replicator(config: replConfig)

// Listen to replicator change events.
replicator.addChangeListener { (change) in
    if let error = change.status.error as NSError? {
        print("Error code :: \(error.code)")
    }
}

// Start replication.
replicator.start()
Build and run. You should see the document ID and property printed to the console. The document was successfully persisted to the database.
In the next step, you will setup Sync Gateway. Before synchronizing documents to Sync Gateway you will need to disable App Transport Security (ATS) on iOS. App Transport Security is enabled by default since iOS 9 and enforces applications to use HTTPS exclusively. For this getting started guide, you will disable it but we recommend to enable it in production (and enable HTTPS on Sync Gateway). In the Xcode navigator, right-click on Info.plist and open it as a source file.
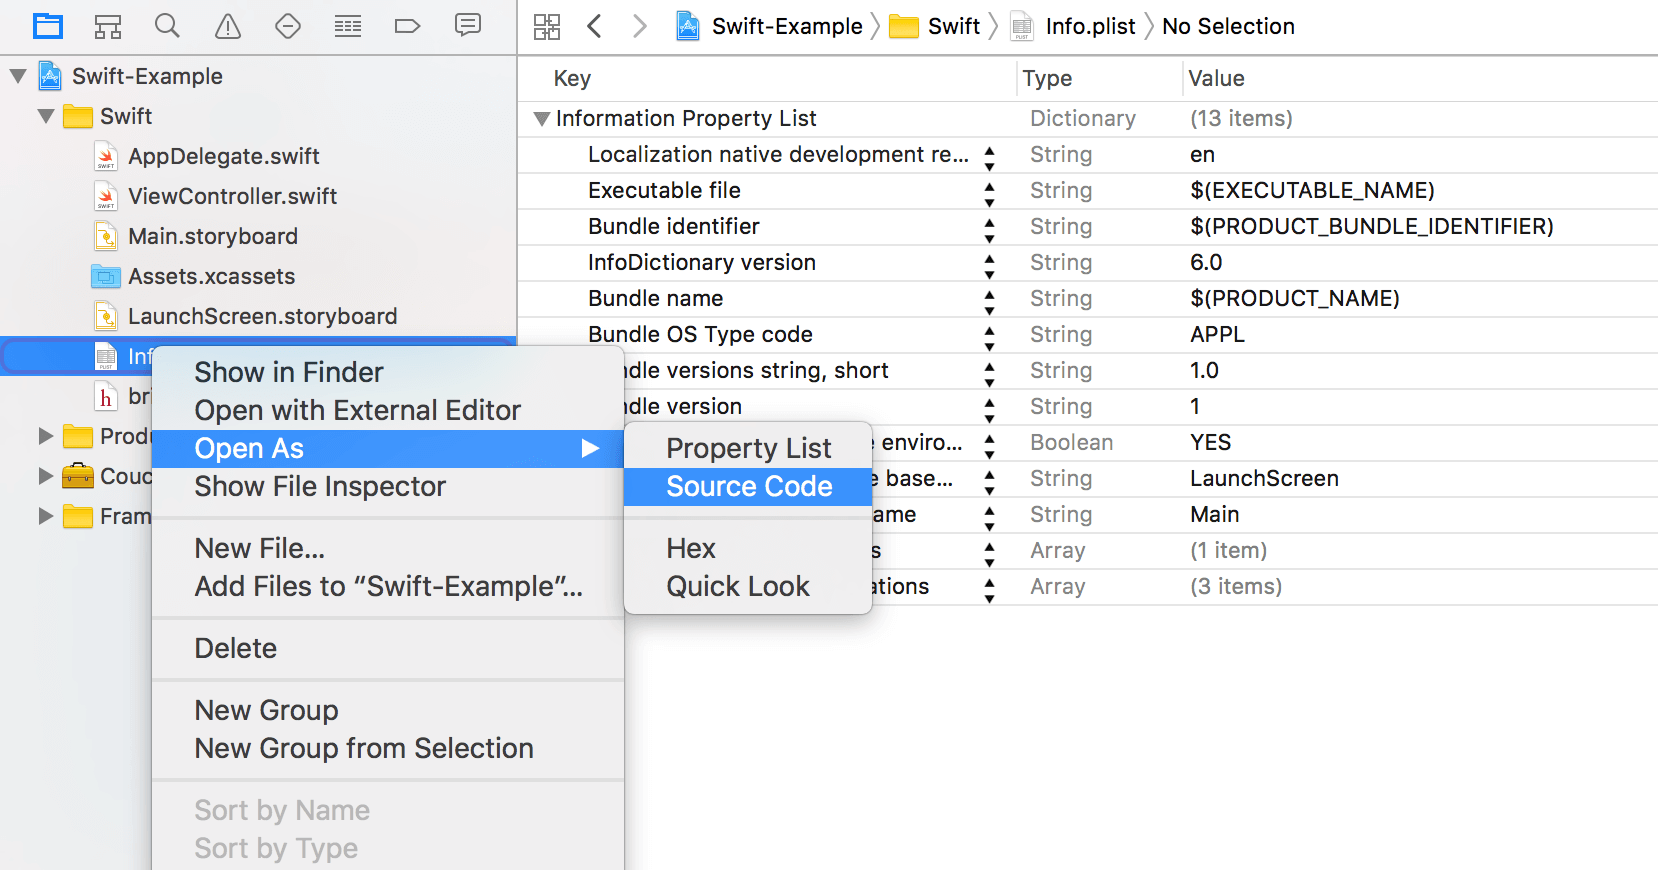
Append the following inside of the <dict> XML tags to disable ATS.
<key>NSAppTransportSecurity</key>
<dict>
<key>NSAllowsArbitraryLoads</key><true/>
</dict>Couchbase Lite Framework Size
Although the size of the Couchbase Lite framework that is downloaded is around 50MB, note that the framework would add only around 3.5MB to the size of the app when it is installed from the App Store. This is because when the user installs your app from the App Store, only the bits that are relevant to the device architecture are delivered.
Why is the original size so large?
The Couchbase Lite framework includes a "fat" binary that contains slices for both device (armv7, arm64) and simulator (i386 and x86_64) CPU architectures.
The fat binary allows you to link your app to the same framework and run your app on the simulator or a real device.
In addition, the bitcode that is included with the framework contributes to the majority of the download size.
Bitcode is an intermediate code representation that allows Apple to recompile the app after App submission and to deliver a thin version of the app specific to the device architecture.
Architecture Stripping
When submitting a build of your application to the App Store you must ensure that it doesn’t contain any simulator architecture otherwise the upload will fail with the error message "Unsupported Architecture. Your executable contains unsupported architecture '[x86_64, i386]'."
The steps to remove the simulator architecture (x86_64) from CouchbaseLite.framework are outlined below. They depend on the method you chose to install Couchbase Lite:
The Couchbase Lite framework available on the downloads page contains a build for both the simulator (x86_64) and iOS devices (ARM). The following steps describe how to set up a build phase in Xcode to do this automatically.
-
In Xcode, open the Build Phases tab, then select the + > Add Run Script Build Phase option.
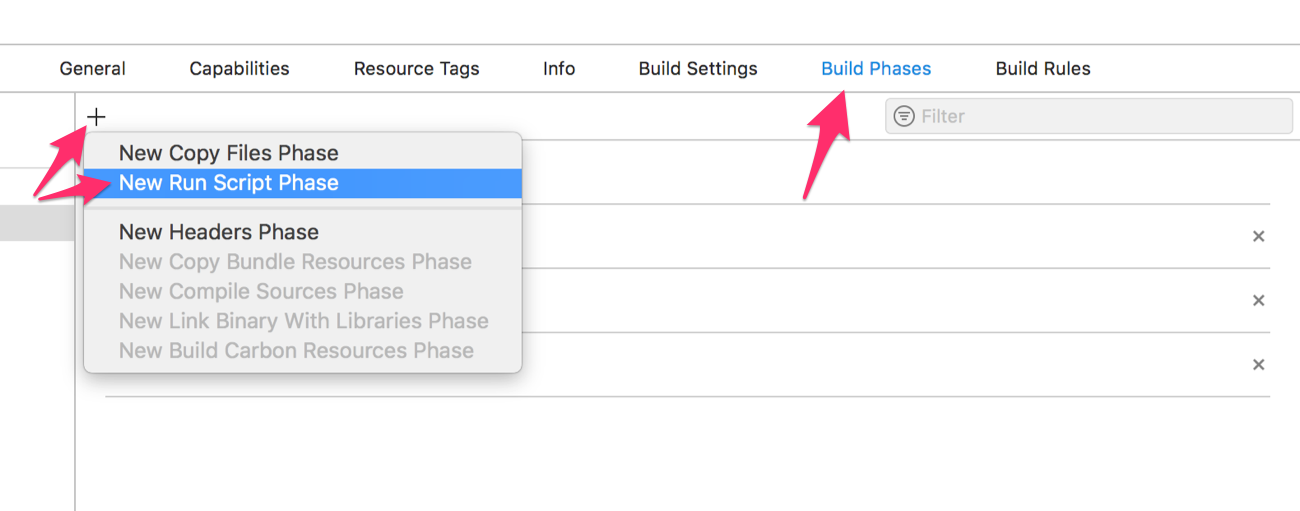
-
Copy the contents of strip_framework.sh in the Run Script editor window.
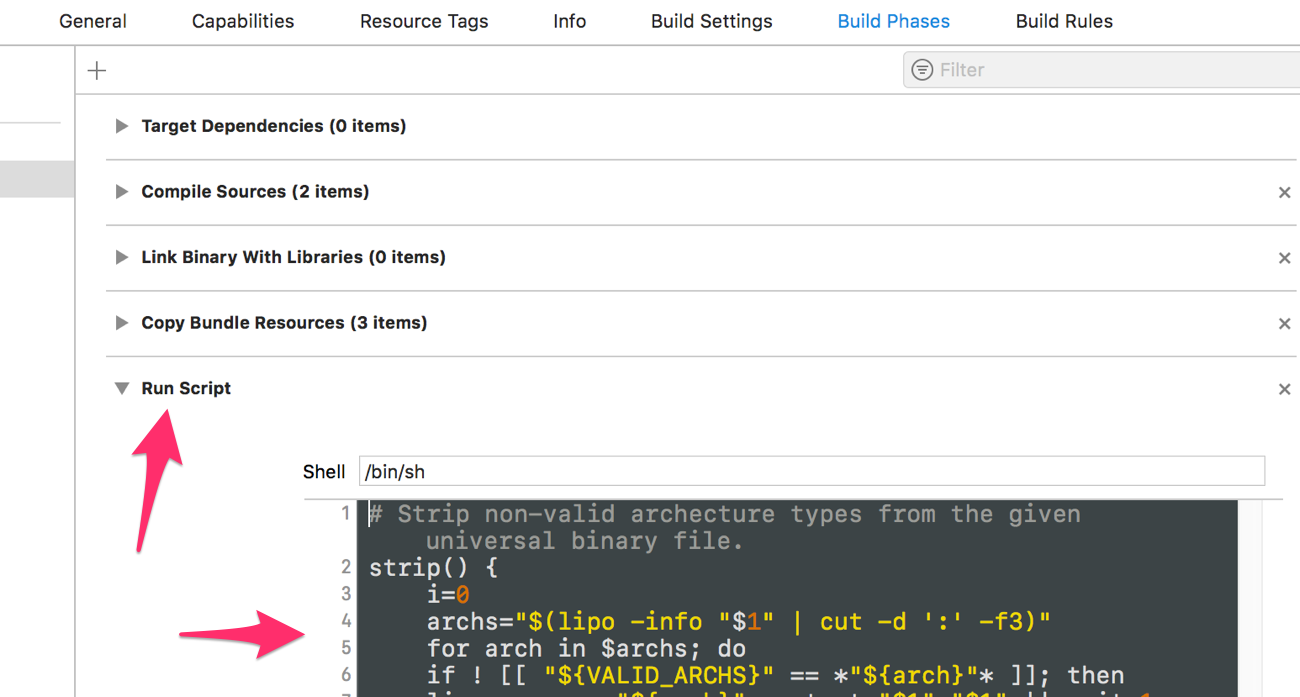
That’s it, now every time you build and run your application, Xcode will remove binary architectures that do not match the target’s architecture type (emulator or device).
The following link describes how to set up a build phase in Xcode and run a Carthage script in order to remove the simulator architecture (x86_64).
Should you disable bitcode?
Although you can disable bitcode within your app and strip away bitcode from the Couchbase Lite framework, it is not necessary to do so. In fact, it is probably best to leave it enabled to be future proof. This is because the bitcode is never downloaded by the user even though it is uploaded during App submission.
Other resource to reduce the size of your app
More information is available on this Apple Q&A page.
Upgrading
Xcode
The API has changed in Couchbase Lite 2.0 and will require porting an application that is using Couchbase Lite 1.x API to the Couchbase Lite 2.0 API. To update an Xcode project built with Couchbase Lite 1.x:
-
Remove the existing CouchbaseLite.framework dependency from the Xcode project.
-
Remove all the Couchbase Lite 1.x dependencies (see the 1.x installation guide).
-
Install the Couchbase Lite 2.0 framework in your project (see the Getting Started section). At this point, there will be many compiler warnings. Refer to the examples on this page to learn about the new API.
-
Build & run your application.
Database Upgrade
Databases that were created with Couchbase Lite 1.2 or later can be used with Couchbase Lite 2.0. Upon detecting it is a 1.x database file, Couchbase Lite will automatically upgrade it to 2.0. This feature is only available for the default storage type (i.e., not a ForestDB database). Additionally, the automatic migration feature does not support encrypted databases, so if the 1.x database is encrypted you will first need to disable encryption using the Couchbase Lite 1.x API (see the 1.x Database Guide).
Handling of Existing Conflicts
For conflicts in the 1.x database, the automatic upgrade process copies the default winning revision to the new 2.0 database and does NOT copy any conflicting revisions. This functionality is related to the way conflicts are being handled in Couchbase Lite 2.0 (see Handling Conflicts). Optionally, existing conflicts in the 1.x database can be resolved with the 1.x API prior to the database being upgraded to 2.0.
Handling of Existing Attachments
Attachments that were persisted in the 1.x database will be copied to the 2.0 database.
In Couchbase Lite 2.0, the Attachment API has been renamed to Blob API.
The functionally is identical but the internal schema for attachments has changed.
In 1.x they were stored under the _attachments field and in Couchbase Lite 2.0 they are stored anywhere in the document like other value types.
The automatic upgrade functionality will not update the internal schema for attachments, so they will still be accessible under the _attachments field.
The following example shows how to retrieve an attachment that was created in a 1.x database with the 2.0 API.
let attachments = document.dictionary(forKey: "_attachments")
let avatar = attachments?.blob(forKey: "avatar")
let content = avatar?.content
Replication Compatibility
The replication protocol used in Couchbase Lite 2.0 has been re-designed from the ground up and it is not backwards compatible with the 1.x replication protocol. Therefore, to use replication with Couchbase Lite 2.x, the target Sync Gateway instance must also be upgraded to 2.x.
Sync Gateway 2.x will continue to accept clients that connect through the 1.x protocol. It will automatically use the 1.x replication protocol when a Couchbase Lite 1.x client connects through http://localhost:4984/db and the 2.0 replication protocol when a Couchbase Lite 2.0 client connects through ws://localhost:4984/db. This allows for a smoother transition to get all your user base onto a version of your application built with Couchbase Lite 2.x.
Database
New Database
As the top-level entity in the API, new databases can be created using the Database class by passing in a name, configuration, or both.
The following example creates a database using the Database(name: String) method.
do {
    self.database = try Database(name: "my-database")
} catch {
    print(error)
}
Just as before, the database will be created in a default location.
Alternatively, the Database(name: Strings, config: DatabaseConfiguration?) initializer can be used to provide specific options in the DatabaseConfiguration object such as the database directory.
Database Encryption
|
Enterprise Edition only
Database encryption is an Enterprise Edition feature.
|
The Couchbase Lite 2.1 release includes the ability to encrypt Couchbase Lite databases. This allows mobile applications to secure the data at rest, when it is being stored on the device. The algorithm used to encrypt the database is 256-bit AES.
To enable encryption, you must set the DatabaseConfiguration.encryptionKey property with the encryption key of your choice.
The encryption key is then required every time the database is opened.
let config = DatabaseConfiguration()
config.encryptionKey = EncryptionKey.password("secretpassword")
self.database = try Database(name: "my-database", config: config)
Couchbase Lite does not persist the key. It is the application’s responsibility to manage the key and store it in a platform specific secure store such as Apple’s Keychain or Android’s Keystore.
An encrypted database can only be opened with the same language SDK that was used to encrypt it in the first place (Swift, C#, Java or Objective-C). For example, if a database is encrypted with the Swift SDK and then exported, it will only be readable with the Swift SDK.
Upgrading from 1.x when Encryption is Enabled
If you’re migrating an application from Couchbase Lite 1.x to 2.x, note that the automatic database upgrade functionality is not supported for encrypted databases. Thus, to upgrade an encrypted 1.x database, you should do the following:
-
Disable encryption using the Couchbase Lite 1.x framework (see 1.x encryption guide)
-
Open the database file with encryption enabled using the Couchbase Lite 2.x framework (see database encryption).
Since it is not possible to package Couchbase Lite 1.x and Couchbase Lite 2.x in the same application this upgrade path would require two successive upgrades. If you are using Sync Gateway to synchronize the database content, it may be preferable to run a pull replication from a new 2.x database with encryption enabled and delete the 1.x local database.
Finding a Database File
When the application is running on the iOS simulator, you can locate the application’s sandbox directory using the SimPholders utility.
CLI tool
cblite is a command-line tool for inspecting and querying Couchbase Lite 2.x databases.
To use it, download Couchbase Lite from the downloads page and navigate to the Tools folder.
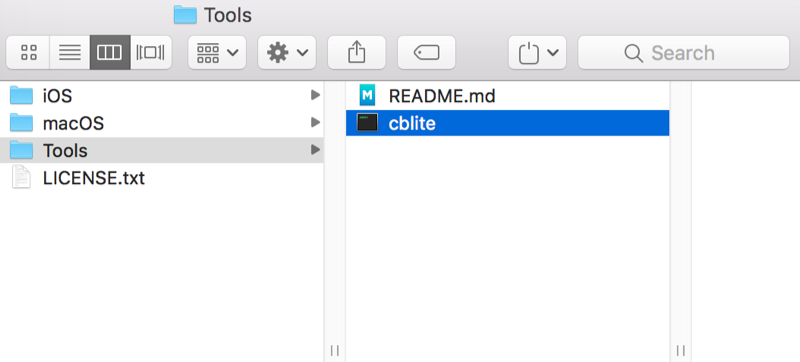
Instructions for various commands are available in Tools/README.md.
Logging
The log messages are split into different domains (LogDomains) which can be tuned to different log levels.
The following example enables verbose logging for the replicator and query domains.
Database.setLogLevel(.verbose, domain: .replicator)
Database.setLogLevel(.verbose, domain: .query)
Loading a pre-built database
If your app needs to sync a lot of data initially, but that data is fairly static and won’t change much, it can be a lot more efficient to bundle a database in your application and install it on the first launch. Even if some of the content changes on the server after you create the app, the app’s first pull replication will bring the database up to date.
To use a prebuilt database, you need to set up the database, build the database into your app bundle as a resource, and install the database during the initial launch.
After your app launches, it needs to check whether the database exists.
If the database does not exist, the app should copy it from the app bundle using the Database.copy(fromPath:toDatabase:withConfig:) method as shown below.
// Note: Getting the path to a database is platform-specific.
// For iOS you need to get the path from the main bundle.
let path = Bundle.main.path(forResource: "travel-sample", ofType: "cblite2")!
if !Database.exists(withName: "travel-sample") {
    do {
        try Database.copy(fromPath: path, toDatabase: "travel-sample", withConfig: nil)
    } catch {
        fatalError("Could not load pre-built database")
    }
}
Document
In Couchbase Lite, a document’s body takes the form of a JSON object—a collection of key/value pairs where the values can be different types of data such as numbers, strings, arrays or even nested objects. Every document is identified by a document ID, which can be automatically generated (as a UUID) or specified programmatically; the only constraints are that it must be unique within the database, and it can’t be changed.
Initializers
The following methods/initializers can be used:
-
The
MutableDocument()initializer can be used to create a new document where the document ID is randomly generated by the database. -
The
MutableDocument(withID: String)initializer can be used to create a new document with a specific ID. -
The
database.document(withID: String)method can be used to get a document. If it doesn’t exist in the database, it will returnnil. This method can be used to check if a document with a given ID already exists in the database.
The following code example creates a document and persists it to the database.
let newTask = MutableDocument()
    .setString("task", forKey: "type")
    .setString("todo", forKey: "owner")
    .setDate(Date(), forKey: "createdAt")
try database.saveDocument(newTask)
Mutability
By default, when a document is read from the database it is immutable.
The document.toMutable() method should be used to create an instance of the document which can be updated.
guard let document = database.document(withID: "xyz") else { return }
let mutableDocument = document.toMutable()
mutableDocument.setString("apples", forKey: "name")
try database.saveDocument(mutableDocument)
Changes to the document are persisted to the database when the saveDocument method is called.
Typed Accessors
The Document class now offers a set of property accessors for various scalar types, including boolean, integers, floating-point and strings.
These accessors take care of converting to/from JSON encoding, and make sure you get the type you’re expecting.
In addition, as a convenience we offer Date accessors.
Dates are a common data type, but JSON doesn’t natively support them, so the convention is to store them as strings in ISO-8601 format.
The following example sets the date on the createdAt property and reads it back using the document.date(forKey: String) accessor method.
newTask.setValue(Date(), forKey: "createdAt")
let date = newTask.date(forKey: "createdAt")
If the property doesn’t exist in the document it will return the default value for that getter method (0 for getInt, 0.0 for getFloat etc.).
If you need to determine whether a given property exists in the document, you should use the Document.Contains(key: String) method.
A Document can be converted to a plain dictionary type.
That’s often useful to pass the document contents as a plain object to another method.
newTask.toDictionary() // returns a Dictionary<String, Any>Batch operations
If you’re making multiple changes to a database at once, it’s faster to group them together. The following example persists a few documents in batch.
do {
    try database.inBatch {
        for i in 0...10 {
            let doc = MutableDocument()
            doc.setValue("user", forKey: "type")
            doc.setValue("user \(i)", forKey: "name")
            doc.setBoolean(false, forKey: "admin")
            try database.saveDocument(doc)
            print("saved user document \(doc.string(forKey: "name")!)")
        }
    }
} catch let error {
    print(error.localizedDescription)
}
At the local level this operation is still transactional: no other Database instances, including ones managed by the replicator can make changes during the execution of the block, and other instances will not see partial changes.
But Couchbase Mobile is a distributed system, and due to the way replication works, there’s no guarantee that Sync Gateway or other devices will receive your changes all at once.
Document change events
It’s also possible to register for document changes.
The following example registers for changes to the document with ID user.john and prints the verified_account property.
database.addDocumentChangeListener(withID: "user.john") { (change) in
    if let document = self.database.document(withID: change.documentID) {
        print("Status :: \(document.string(forKey: "verified_account")!)")
    }
}
Blobs
We’ve renamed "attachments" to "blobs".
The new behavior should be clearer too: a Blob is now a normal object that can appear in a document as a property value.
In other words, you just instantiate a Blob and set it as the value of a property, and then later you can get the property value, which will be a Blob object.
The following code example adds a blob to the document under the avatar property.
let appleImage = UIImage(named: "avatar.jpg")!
let imageData = UIImageJPEGRepresentation(appleImage, 1)!

let blob = Blob(contentType: "image/jpeg", data: imageData)
newTask.setBlob(blob, forKey: "avatar")
try database.saveDocument(newTask)

if let taskBlob = newTask.blob(forKey: "image") {
    image = UIImage(data: taskBlob.content!)
}
The Blob API lets you access the contents as in-memory data (a Data object) or as a InputStream.
It also supports an optional type property that by convention stores the MIME type of the contents.
In the example above, "image/jpeg" is the MIME type and "avatar" is the key which references that Blob.
That key can be used to retrieve the Blob object at a later time.
On Couchbase Lite, blobs can be arbitrarily large, and are only read on demand, not when you load a Document object.
On Sync Gateway, the maximum content size is 20 MB per blob.
If a document’s blob is over 20 MB, the document will be replicated but not the blob.
When a document is synchronized, the Couchbase Lite replicator will add an _attachments dictionary to the document’s properties if it contains a blob.
A random access name will be generated for each Blob which is different to the "avatar" key that was used in the example above.
On the image below, the document now contains the _attachments dictionary when viewed in the Couchbase Server Admin Console.
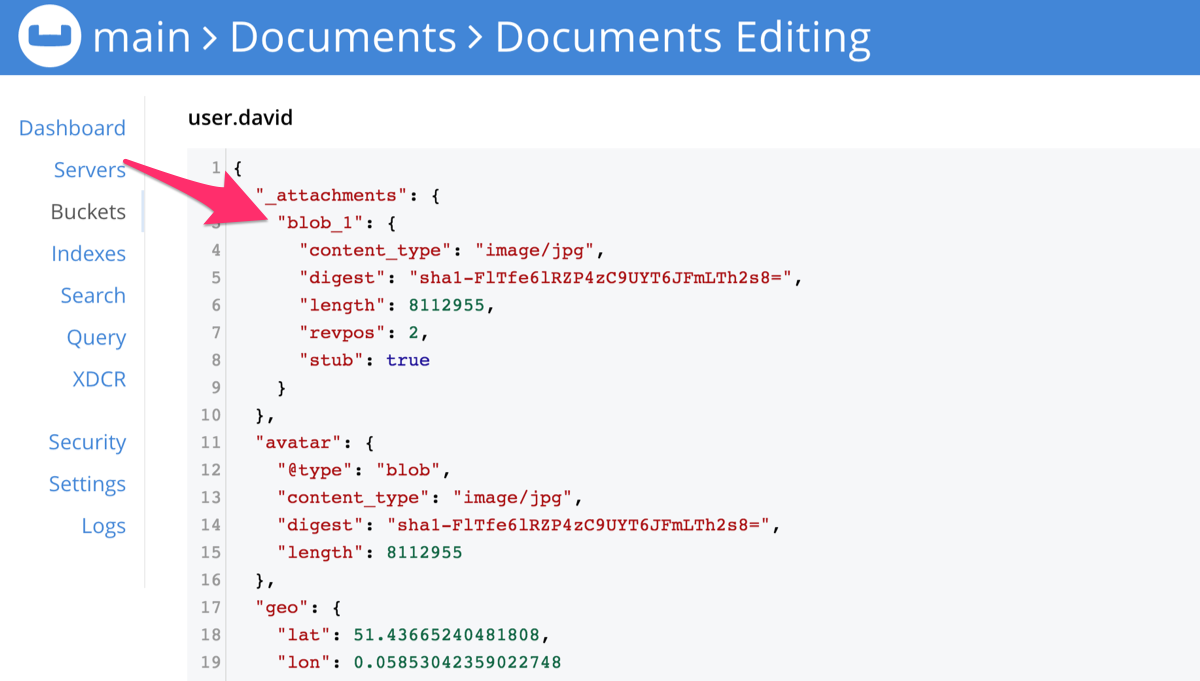
A blob also has properties such as "digest" (a SHA-1 digest of the data), "length" (the length in bytes), and optionally "content_type" (the MIME type).
The data is not stored in the document, but in a separate content-addressable store, indexed by the digest.
This Blob can be retrieved on the Sync Gateway REST API at http://localhost:4984/justdoit/user.david/blob_1.
Notice that the blob identifier in the URL path is "blob_1" (not "avatar").
Query
Database queries have changed significantly. Instead of the map/reduce views used in 1.x, they’re now based on expressions, of the form "return ____ from documents where ____, ordered by ____", with semantics based on Couchbase’s N1QL query language.
There are several parts to specifying a query:
- SELECT
-
Specifies the projection, which is the part of the document that is to be returned.
- FROM
-
Specifies the database to query the documents from.
- JOIN
-
Specifies the matching criteria in which to join multiple documents.
- WHERE
-
Specifies the query criteria that the result must satisfy.
- GROUP BY
-
Specifies the query criteria to group rows by.
- ORDER BY
-
Specifies the query criteria to sort the rows in the result.
SELECT statement
With the SELECT statement, you can query and manipulate JSON data. With projections, you retrieve just the fields that you need and not the entire document.
A SelectResult represents a single return value of the query statement.
You can specify a comma separated list of SelectResult expressions in the select statement of your query.
For instance the following select statement queries for the document _id as well as the type and name properties of all documents in the database.
In the query result, we print the _id and name properties of each row using the property name getter method.
{
    "_id": "hotel123",
    "type": "hotel",
    "name": "Apple Droid"
}
let query = QueryBuilder
.select(
SelectResult.expression(Meta.id),
SelectResult.property("type"),
SelectResult.property("name")
)
.from(DataSource.database(database))
do {
for result in try query.execute() {
print("document id :: \(result.string(forKey: "id")!)")
print("document name :: \(result.string(forKey: "name")!)")
}
} catch {
print(error)
}The SelectResult.all() method can be used to query all the properties of a document.
In this case, the document in the result is embedded in a dictionary where the key is the database name.
The following snippet shows the same query using SelectResult.all() and the result in JSON.
let query = QueryBuilder
    .select(SelectResult.all())
    .from(DataSource.database(database))
[
{
"travel-sample": {
"callsign": "MILE-AIR",
"country": "United States",
"iata": "Q5",
"icao": "MLA",
"id": 10,
"name": "40-Mile Air",
"type": "airline"
}
},
{
"travel-sample": {
"callsign": "TXW",
"country": "United States",
"iata": "TQ",
"icao": "TXW",
"id": 10123,
"name": "Texas Wings",
"type": "airline"
}
}
]WHERE statement
Similar to SQL, you can use the where clause to filter the documents to be returned as part of the query.
The select statement takes in an Expression.
You can chain any number of Expressions in order to implement sophisticated filtering capabilities.
Comparison
The comparison operators can be used in the WHERE statement to specify on which property to match documents.
In the example below, we use the equalTo operator to query documents where the type property equals "hotel".
{
    "_id": "hotel123",
    "type": "hotel",
    "name": "Apple Droid"
}
let query = QueryBuilder
.select(SelectResult.all())
.from(DataSource.database(database))
.where(Expression.property("type").equalTo(Expression.string("hotel")))
.limit(Expression.int(10))
do {
for result in try query.execute() {
if let dict = result.dictionary(forKey: "travel-sample") {
print("document name :: \(dict.string(forKey: "name")!)")
}
}
} catch {
print(error)
}Collection Operators
Collection operators are useful to check if a given value is present in an array.
CONTAINS Operator
The following example uses the Function.arrayContains to find documents whose public_likes array property contain a value equal to "Armani Langworth".
{
    "_id": "hotel123",
    "name": "Apple Droid",
    "public_likes": ["Armani Langworth", "Elfrieda Gutkowski", "Maureen Ruecker"]
}
let query = QueryBuilder
.select(
SelectResult.expression(Meta.id),
SelectResult.property("name"),
SelectResult.property("public_likes")
)
.from(DataSource.database(database))
.where(Expression.property("type").equalTo(Expression.string("hotel"))
.and(ArrayFunction.contains(Expression.property("public_likes"), value: Expression.string("Armani Langworth")))
)
do {
for result in try query.execute() {
print("public_likes :: \(result.array(forKey: "public_likes")!.toArray())")
}
}IN Operator
The IN operator is useful when you need to explicitly list out the values to test against.
The following example looks for documents whose first, last or username property value equals "Armani".
let values = [Expression.property("first"), Expression.property("last"), Expression.property("username")]

QueryBuilder
    .select(SelectResult.all())
    .from(DataSource.database(database))
    .where(Expression.string("Armani").in(values))
Like Operator
The like operator can be used for string matching.
Use the like operator for case insensitive matches and the regex operator (see below) for case sensitive matches.
In the example below, we are looking for documents of type landmark where the name property exactly matches the string "Royal engineers museum".
Note that since like does a case insensitive match, the following query will return "landmark" type documents with name matching "Royal Engineers Museum", "royal engineers museum", "ROYAL ENGINEERS MUSEUM" and so on.
let query = QueryBuilder
    .select(
        SelectResult.expression(Meta.id),
        SelectResult.property("country"),
        SelectResult.property("name")
    )
    .from(DataSource.database(database))
    .where(Expression.property("type").equalTo(Expression.string("landmark"))
        .and( Expression.property("name").like(Expression.string("Royal engineers museum")))
    )
    .limit(Expression.int(10))

do {
    for result in try query.execute() {
        print("name property :: \(result.string(forKey: "name")!)")
    }
}
Wildcard Match
We can use % sign within a like expression to do a wildcard match against zero or more characters.
Using wildcards allows you to have some fuzziness in your search string.
In the example below, we are looking for documents of type "landmark" where the name property matches any string that begins with "eng" followed by zero or more characters, the letter "e", followed by zero or more characters.
The following query will return "landmark" type documents with name matching "Engineers", "engine", "english egg" , "England Eagle" and so on.
Notice that the matches may span word boundaries.
let query = QueryBuilder
    .select(
        SelectResult.expression(Meta.id),
        SelectResult.property("country"),
        SelectResult.property("name")
    )
    .from(DataSource.database(database))
    .where(Expression.property("type").equalTo(Expression.string("landmark"))
        .and(Expression.property("name").like(Expression.string("eng%e%")))
    )
    .limit(Expression.int(10))
Wildcard Character Match
We can use _ sign within a like expression to do a wildcard match against a single character.
In the example below, we are looking for documents of type "landmark" where the name property matches any string that begins with "eng" followed by exactly 4 wildcard characters and ending in the letter "r".
The following query will return "landmark" type documents with the name matching "Engineer", "engineer" and so on.
let query = QueryBuilder
    .select(
        SelectResult.expression(Meta.id),
        SelectResult.property("country"),
        SelectResult.property("name")
    )
    .from(DataSource.database(database))
    .where(Expression.property("type").equalTo(Expression.string("landmark"))
        .and(Expression.property("name").like(Expression.string("eng____r")))
    )
    .limit(Expression.int(10))
Regex Operator
The regex operator can be used for case sensitive matches.
Similar to wildcard like expressions, regex expressions based pattern matching allow you to have some fuzziness in your search string.
In the example below, we are looking for documents of type "landmark" where the name property matches any string (on word boundaries) that begins with "eng" followed by exactly 4 wildcard characters and ending in the letter "r".
The following query will return "landmark" type documents with name matching "Engine", "engine" and so on.
Note that the \b specifies that the match must occur on word boundaries.
let query = QueryBuilder
    .select(
        SelectResult.expression(Meta.id),
        SelectResult.property("name")
    )
    .from(DataSource.database(database))
    .where(Expression.property("type").equalTo(Expression.string("landmark"))
        .and(Expression.property("name").like(Expression.string("\\bEng.*e\\b")))
    )
    .limit(Expression.int(10))
JOIN statement
The JOIN clause enables you to create new input objects by combining two or more source objects.
The following example uses a JOIN clause to find the airline details which have routes that start from RIX.
This example JOINS the document of type "route" with documents of type "airline" using the document ID (_id) on the "airline" document and airlineid on the "route" document.
let query = QueryBuilder
    .select(
        SelectResult.expression(Expression.property("name").from("airline")),
        SelectResult.expression(Expression.property("callsign").from("airline")),
        SelectResult.expression(Expression.property("destinationairport").from("route")),
        SelectResult.expression(Expression.property("stops").from("route")),
        SelectResult.expression(Expression.property("airline").from("route"))
    )
    .from(
        DataSource.database(database!).as("airline")
    )
    .join(
        Join.join(DataSource.database(database!).as("route"))
            .on(
                Meta.id.from("airline")
                    .equalTo(Expression.property("airlineid").from("route"))
        )
    )
    .where(
        Expression.property("type").from("route").equalTo(Expression.string("route"))
            .and(Expression.property("type").from("airline").equalTo(Expression.string("airline")))
            .and(Expression.property("sourceairport").from("route").equalTo(Expression.string("RIX")))
)
GROUP BY statement
You can perform further processing on the data in your result set before the final projection is generated. The following example looks for the number of airports at an altitude of 300 ft or higher and groups the results by country and timezone.
{
    "_id": "airport123",
    "type": "airport",
    "country": "United States",
    "geo": { "alt": 456 },
    "tz": "America/Anchorage"
}
let query = QueryBuilder
.select(
SelectResult.expression(Function.count(Expression.all())),
SelectResult.property("country"),
SelectResult.property("tz"))
.from(DataSource.database(database))
.where(
Expression.property("type").equalTo(Expression.string("airport"))
.and(Expression.property("geo.alt").greaterThanOrEqualTo(Expression.int(300)))
).groupBy(
Expression.property("country"),
Expression.property("tz")
)
do {
for result in try query.execute() {
print("There are \(result.int(forKey: "$1")) airports on the \(result.string(forKey: "tz")!) timezone located in \(result.string(forKey: "country")!) and above 300 ft")
}
}There are 138 airports on the Europe/Paris timezone located in France and above 300 ft
There are 29 airports on the Europe/London timezone located in United Kingdom and above 300 ft
There are 50 airports on the America/Anchorage timezone located in United States and above 300 ft
There are 279 airports on the America/Chicago timezone located in United States and above 300 ft
There are 123 airports on the America/Denver timezone located in United States and above 300 ftORDER BY statement
It is possible to sort the results of a query based on a given expression result. The example below returns documents of type equal to "hotel" sorted in ascending order by the value of the title property.
let query = QueryBuilder
    .select(
        SelectResult.expression(Meta.id),
        SelectResult.property("title"))
    .from(DataSource.database(database))
    .where(Expression.property("type").equalTo(Expression.string("hotel")))
    .orderBy(Ordering.property("title").ascending())
    .limit(Expression.int(10))
Aberdyfi
Achiltibuie
Altrincham
Ambleside
Annan
Ardèche
Armagh
AvignonIndexing
Creating indexes can speed up the performance of queries. While indexes make queries faster, they also make writes slightly slower, and the Couchbase Lite database file slightly larger. As such, it is best to only create indexes when you need to optimize a specific case for better query performance.
The following example creates a new index for the type and name properties.
{
    "_id": "hotel123",
    "type": "hotel",
    "name": "Apple Droid"
}
let index = IndexBuilder.valueIndex(items:
ValueIndexItem.expression(Expression.property("type")),
ValueIndexItem.expression(Expression.property("name")))
try database.createIndex(index, withName: "TypeNameIndex")If there are multiple expressions, the first one will be the primary key, the second the secondary key, etc.
| Every index has to be updated whenever a document is updated, so too many indexes can hurt performance. Thus, good performance depends on designing and creating the right indexes to go along with your queries. |
Change Events
A live query stays active and monitors the database for changes. When there’s a change it re-runs itself automatically, and if the query results changed it notifies any observers. A live query is a great way to build reactive user interfaces, especially table/list views, that keep themselves up to date. For example, as the replicator runs and pulls new data from the server, a live query-driven UI will automatically update to show the data without the user having to manually refresh. This helps your app feel quick and responsive.
let token = query.addChangeListener { (change) in
    for result in change.results! { (1)
        print(result.keys)
        /* Update UI */
    }
}| 1 | The live query starts immediately and changes are posted asynchronously. |
The following example stops the live query with the token from the previous example.
query.removeChangeListener(withToken: token)Full-Text Search
To run a full-text search (FTS) query, you must have created a full-text index on the expression being matched.
Unlike queries, the index is not optional.
The following example inserts documents and creates an FTS index on the name property.
// Insert documents
let tasks = ["buy groceries", "play chess", "book travels", "buy museum tickets"]
for task in tasks {
    let doc = MutableDocument()
    doc.setString("task", forKey: "type")
    doc.setString(task, forKey: "name")
    try database.saveDocument(doc)
}

// Create index
do {
    let index = IndexBuilder.fullTextIndex(items: FullTextIndexItem.property("name")).ignoreAccents(false)
    try database.createIndex(index, withName: "nameFTSIndex")
} catch let error {
    print(error.localizedDescription)
}
Multiple properties to index can be specified in the Index.fullTextIndex(withItems: [FullTextIndexItem]) method.
With the index created, an FTS query on the property that is being indexed can be constructed and ran.
The full-text search criteria is defined as a FullTextExpression.
The left-hand side is the full-text index to use and the right-hand side is the pattern to match.
let whereClause = FullTextExpression.index("nameFTSIndex").match("'buy'")
let query = QueryBuilder
    .select(SelectResult.expression(Meta.id))
    .from(DataSource.database(database))
    .where(whereClause)

do {
    for result in try query.execute() {
        print("document id \(result.string(at: 0)!)")
    }
} catch let error {
    print(error.localizedDescription)
}
In the example above, the pattern to match is a word, the full-text search query matches all documents that contain the word "buy" in the value of the doc.name property.
Full-text search is supported in the following languages: danish, dutch, english, finnish, french, german, hungarian, italian, norwegian, portuguese, romanian, russian, spanish, swedish and turkish.
The pattern to match can also be in the following forms:
- prefix queries
-
The query expression used to search for a term prefix is the prefix itself with a "*" character appended to it. For example:
"'lin*'"
-- Query for all documents containing a term with the prefix "lin". This will match
-- all documents that contain "linux", but also those that contain terms "linear",
--"linker", "linguistic" and so on.
- overriding the property name that is being indexed
-
Normally, a token or token prefix query is matched against the document property specified as the left-hand side of the
matchoperator. This may be overridden by specifying a property name followed by a ":" character before a basic term query. There may be space between the ":" and the term to query for, but not between the property name and the ":" character. For example:'title:linux problems' -- Query the database for documents for which the term "linux" appears in -- the document title, and the term "problems" appears in either the title -- or body of the document.
- phrase queries
-
A phrase query is a query that retrieves all documents that contain a nominated set of terms or term prefixes in a specified order with no intervening tokens. Phrase queries are specified by enclosing a space separated sequence of terms or term prefixes in double quotes ("). For example:
"'"linux applications"'"
-- Query for all documents that contain the phrase "linux applications".
- NEAR queries
-
A NEAR query is a query that returns documents that contain a two or more nominated terms or phrases within a specified proximity of each other (by default with 10 or less intervening terms). A NEAR query is specified by putting the keyword "NEAR" between two phrase, token or token prefix queries. To specify a proximity other than the default, an operator of the form "NEAR/" may be used, where is the maximum number of intervening terms allowed. For example:
"'database NEAR/2 "replication"'"
-- Search for a document that contains the phrase "replication" and the term
-- "database" with not more than 2 terms separating the two.
- AND, OR & NOT query operators
-
The enhanced query syntax supports the AND, OR and NOT binary set operators. Each of the two operands to an operator may be a basic FTS query, or the result of another AND, OR or NOT set operation. Operators must be entered using capital letters. Otherwise, they are interpreted as basic term queries instead of set operators. For example:
'couchbase AND database'
-- Return the set of documents that contain the term "couchbase", and the
-- term "database". This query will return the document with docid 3 only.
When using the enhanced query syntax, parenthesis may be used to specify the precedence of the various operators. For example:
'("couchbase database" OR "sqlite library") AND linux'
-- Query for the set of documents that contains the term "linux", and at least
-- one of the phrases "couchbase database" and "sqlite library".
Ordering results
It’s very common to sort full-text results in descending order of relevance.
This can be a very difficult heuristic to define, but Couchbase Lite comes with a ranking function you can use.
In the OrderBy array, use a string of the form Rank(X), where X is the property or expression being searched, to represent the ranking of the result.
Replication
Couchbase Mobile 2.0 uses a new replication protocol based on WebSockets.
The replicator is designed to send documents from a source to a target database. The target can be one of the following:
URLEndpoint-
To replicate data between a local Couchbase Lite database and remote Sync Gateway database using the WebSocket protocol ([start here]).
DatabaseEndpoint-
To replicate data between two local Couchbase Lite databases. This target can be used to create a local back-up of a database ([database replicas])
MessageEndpoint-
Allows a local database to replicate with another Couchbase Lite database via a custom transportation protocol such iOS Multipeer Connectivity, Android WiFi Direct, Android NearByConnection, socket based transportation etc. (see [Message Endpoint])
Compatibility
| The new protocol is incompatible with CouchDB-based databases. And since Couchbase Lite 2 only supports the new protocol, you will need to run a version of Sync Gateway that supports it. |
To use this protocol with Couchbase Lite 2.0, the replication URL should specify WebSockets as the URL scheme (see the "Starting a Replication" section below). Mobile clients using Couchbase Lite 1.x can continue to use http as the URL scheme. Sync Gateway 2.0 will automatically use the 1.x replication protocol when a Couchbase Lite 1.x client connects through "http://localhost:4984/db" and the 2.0 replication protocol when a Couchbase Lite 2.0 client connects through "ws://localhost:4984/db".
Starting Sync Gateway
Download Sync Gateway and start it from the command line with the configuration file created above.
~/Downloads/couchbase-sync-gateway/bin/sync_gatewayFor platform specific installation instructions, refer to the Sync Gateway installation guide.
Starting a Replication
Replication can be bidirectional, this means you can start a push/pull replication with a single instance.
The replication’s parameters can be specified through the ReplicatorConfiguration object;
for example, if you wish to start a push only or pull only replication.
The following example creates a pull replication with Sync Gateway.
class MyClass {
    var database: Database?
    var replicator: Replicator? (1)

    func startReplicator() {
        let url = URL(string: "ws://localhost:4984/db")! (2)
        let target = URLEndpoint(url: url)
        let config = ReplicatorConfiguration(database: database!, target: target)
        config.replicatorType = .pull

        self.replicator = Replicator(config: config)
        self.replicator?.start()
    }
}| 1 | A replication is an asynchronous operation.
To keep a reference to the replicator object, you can set it as an instance property. |
| 2 | The URL scheme for remote database URLs has changed in Couchbase Lite 2.0.
You should now use ws:, or wss: for SSL/TLS connections. |
To verify that documents have been replicated, you can:
-
Monitor the Sync Gateway sequence number returned by the database endpoint (
GET /{db}/). The sequence number increments for every change that happens on the Sync Gateway database. -
Query a document by ID on the Sync Gateway REST API (
GET /{db}/{id}). -
Query a document from the Query Workbench on the Couchbase Server Console.
Couchbase Lite 2.0 uses WebSockets as the communication protocol to transmit data. Some load balancers are not configured for WebSocket connections by default (NGINX for example); so it might be necessary to explicitly enable them in the load balancer’s configuration (see Load Balancers).
By default, the WebSocket protocol uses compression to optimize for speed and bandwidth utilization.
The level of compression is set on Sync Gateway and can be tuned in the configuration file (replicator_compression).
Troubleshooting
As always, when there is a problem with replication, logging is your friend. The following example increases the log output for activity related to replication with Sync Gateway.
// Replicator
Database.setLogLevel(.verbose, domain: .replicator)
// Network
Database.setLogLevel(.verbose, domain: .network)
Authentication
By default, Sync Gateway does not enable authentication. This is to make it easier to get up and running with synchronization. You can enable authentication with the following properties in the configuration file:
{
  "databases": {
    "mydatabase": {
      "users": {
        "GUEST": {"disabled": true}
      }
    }
  }
}
To authenticate with Sync Gateway, an associated user must first be created.
Sync Gateway users can be created through the POST /{db}/_user endpoint on the Admin REST API.
Provided that the user exists on Sync Gateway, there are two ways to authenticate from a Couchbase Lite client: Basic Authentication or Session Authentication.
Basic Authentication
You can provide a user name and password to the basic authenticator class method.
Under the hood, the replicator will send the credentials in the first request to retrieve a SyncGatewaySession cookie and use it for all subsequent requests during the replication.
This is the recommended way of using basic authentication.
The following example initiates a one-shot replication as the user john with the password pass.
let url = URL(string: "ws://localhost:4984/mydatabase")!
let target = URLEndpoint(url: url)
let config = ReplicatorConfiguration(database: database, target: target)
config.authenticator = BasicAuthenticator(username: "john", password: "pass")

self.replicator = Replicator(config: config)
self.replicator.start()
Session Authentication
Session authentication is another way to authenticate with Sync Gateway.
A user session must first be created through the POST /{db}/_session endpoint on the Public REST API.
The HTTP response contains a session ID which can then be used to authenticate as the user it was created for.
The following example initiates a one-shot replication with the session ID that is returned from the POST /{db}/_session endpoint.
let url = URL(string: "ws://localhost:4984/mydatabase")!
let target = URLEndpoint(url: url)
let config = ReplicatorConfiguration(database: database, target: target)
config.authenticator = SessionAuthenticator(sessionID: "904ac010862f37c8dd99015a33ab5a3565fd8447")

self.replicator = Replicator(config: config)
self.replicator.start()
Replication Status
The replication.status.activity property can be used to check the status of a replication.
For example, when the replication is actively transferring data and when it has stopped.
self.replicator.addChangeListener { (change) in
    if change.status.activity == .stopped {
        print("Replication stopped")
    }
}
The following table lists the different activity levels in the API and the meaning of each one.
| State | Meaning |
|---|---|
|
The replication is finished or hit a fatal error. |
|
The replicator is offline as the remote host is unreachable. |
|
The replicator is connecting to the remote host. |
|
The replication caught up with all the changes available from the server.
The |
|
The replication is actively transferring data. |
Handling Network Errors
If an error occurs, the replication status will be updated with an Error which follows the standard HTTP error codes.
The following example monitors the replication for errors and logs the error code to the console.
self.replicator.addChangeListener { (change) in
    if let error = change.status.error as NSError? {
        print("Error code :: \(error.code)")
    }
}
When a permanent error occurs (i.e., 404: not found, 401: unauthorized), the replicator (continuous or one-shot) will stop permanently.
If the error is temporary (i.e., waiting for the network to recover), a continuous replication will retry to connect indefinitely and if the replication is one-shot it will retry for a limited number of times.
The following error codes are considered temporary by the Couchbase Lite replicator and thus will trigger a connection retry.
-
408: Request Timeout -
429: Too Many Requests -
500: Internal Server Error -
502: Bad Gateway -
503: Service Unavailable -
504: Gateway Timeout -
1001: DNS resolution error
Custom Headers
Custom headers can be set on the configuration object. And the replicator will send those header(s) in every request. As an example, this feature can be useful to pass additional credentials when there is an authentication or authorization step being done by a proxy server (between Couchbase Lite and Sync Gateway).
let config = ReplicatorConfiguration(database: database, target: target)
config.headers = ["CustomHeaderName": "Value"]
Replication Checkpoint Reset
Checkpoints are used by the replicator to keep track of documents that are sent to the target database. Without checkpoints, Couchbase Lite would send the entire database content every time it connects to the target database, even though the target database may already have the majority of the database content from previous replications.
This functionality is generally not a concern to application developers. But if you require the replication to start again from zero then you may call the checkpoint reset method before starting the replicator.
self.replicator.resetCheckpoint()
self.replicator.start()
Handling Conflicts
In Couchbase Lite 2.0, document conflicts are automatically resolved.
This functionality aims to simplify the default behavior of conflict handling and save disk space (conflicting revisions will no longer be stored in the database).
There are 2 different save method signatures to specify how to handle a possible conflict:
-
save(document: MutableDocument): when concurrent writes to an individual record occur, the conflict is automatically resolved and only one non-conflicting document update is stored in the database. The Last-Write-Win (LWW) algorithm is used to pick the winning revision. -
save(document: MutableDocument, concurrencyControl: ConcurrencyControl): attempts to save the document with a concurrency control. The concurrency control parameter has two possible values:-
lastWriteWins: The last operation wins if there is a conflict. -
failOnConflict: The operation will fail if there is a conflict.
-
Similarly to the save operation, the delete operation also has two method signatures to specify how to handle a possible conflict:
-
delete(document: Document): The last write will win if there is a conflict. -
delete(document: Document, concurrencyControl: ConcurrencyControl): attemps to delete the document with a concurrency control. The concurrency control parameter has two possible values:-
lastWriteWins: The last operation wins if there is a conflict. -
failOnConflict: The operation will fail if there is a conflict.
-
Database Replicas
Database replicas is available in the Enterprise Edition only (https://www.couchbase.com/downloads). Starting in Couchbase Lite 2.0, replication between two local databases is now supported. It allows a Couchbase Lite replicator to store data on secondary storage. It would be especially useful in scenarios where a user’s device is damaged and the data needs to be moved to a different device. Note that the code below won’t compile if you’re running the Community Edition of Couchbase Lite.
let targetDatabase = DatabaseEndpoint(database: database2)
let config = ReplicatorConfiguration(database: database, target: targetDatabase)
config.replicatorType = .push

self.replicator = Replicator(config: config)
self.replicator.start()
Certificate Pinning
Couchbase Lite supports certificate pinning. Certificate pinning is a technique that can be used by applications to "pin" a host to it’s certificate. The certificate is typically delivered to the client by an out-of-band channel and bundled with the client. In this case, Couchbase Lite uses this embedded certificate to verify the trustworthiness of the server and no longer needs to rely on a trusted third party for that (commonly referred to as the Certificate Authority).
The openssl command can be used to create a new self-signed certificate and convert the .pem file to a .cert file (see creating your own self-signed certificate).
You should then have 3 files: cert.pem, cert.cer and key.pem.
The cert.pem and key.pem can be used in the Sync Gateway configuration (see installing the certificate).
On the Couchbase Lite side, the replication must be configured with the cert.cer file.
let data = try self.dataFromResource(name: "cert", ofType: "cer")
let certificate = SecCertificateCreateWithData(nil, data)

let config = ReplicatorConfiguration(database: database, target: target)
config.pinnedServerCertificate = certificate
This example loads the certificate from the application sandbox, then converts it to the appropriate type to configure the replication object.
Peer-to-Peer Sync
|
Enterprise Edition only
Peer-to-peer sync is an Enterprise Edition feature.
|
Peer-to-peer sync allows devices running Couchbase Lite to directly sync data with each other. As part of this, Couchbase Lite is responsible for storing the data and keeping track of the data exchange, but isn’t responsible for the data transfer itself. Sending and receiving data must be handled by the platform APIs or a third party framework. In this section, we will refer to these third party frameworks as communication frameworks.
On iOS, Apple’s Multipeer Connectivity Framework would be a good choice for the Communication Framework. This framework will handle sending and receiving messages and supports multiple transport technologies — WiFi and Bluetooth and uses whichever is available to establish a connection between devices.
Thus, to enable peer-to-peer sync with Couchbase Lite, the application must use the Communication Framework with Couchbase Lite. The following sections describe a typical peer-to-peer workflow. Where applicable, we discuss how to integrate Couchbase Lite into the workflow.
In Couchbase Lite, a peer can take on one of these two roles:
- Active Peer
-
The peer that initializes the connection and replication (i.e the "client" side).
- Passive Peer
-
The passive side reacts to things that it receives but does not initiate any communication on its own (i.e. the "server" side).
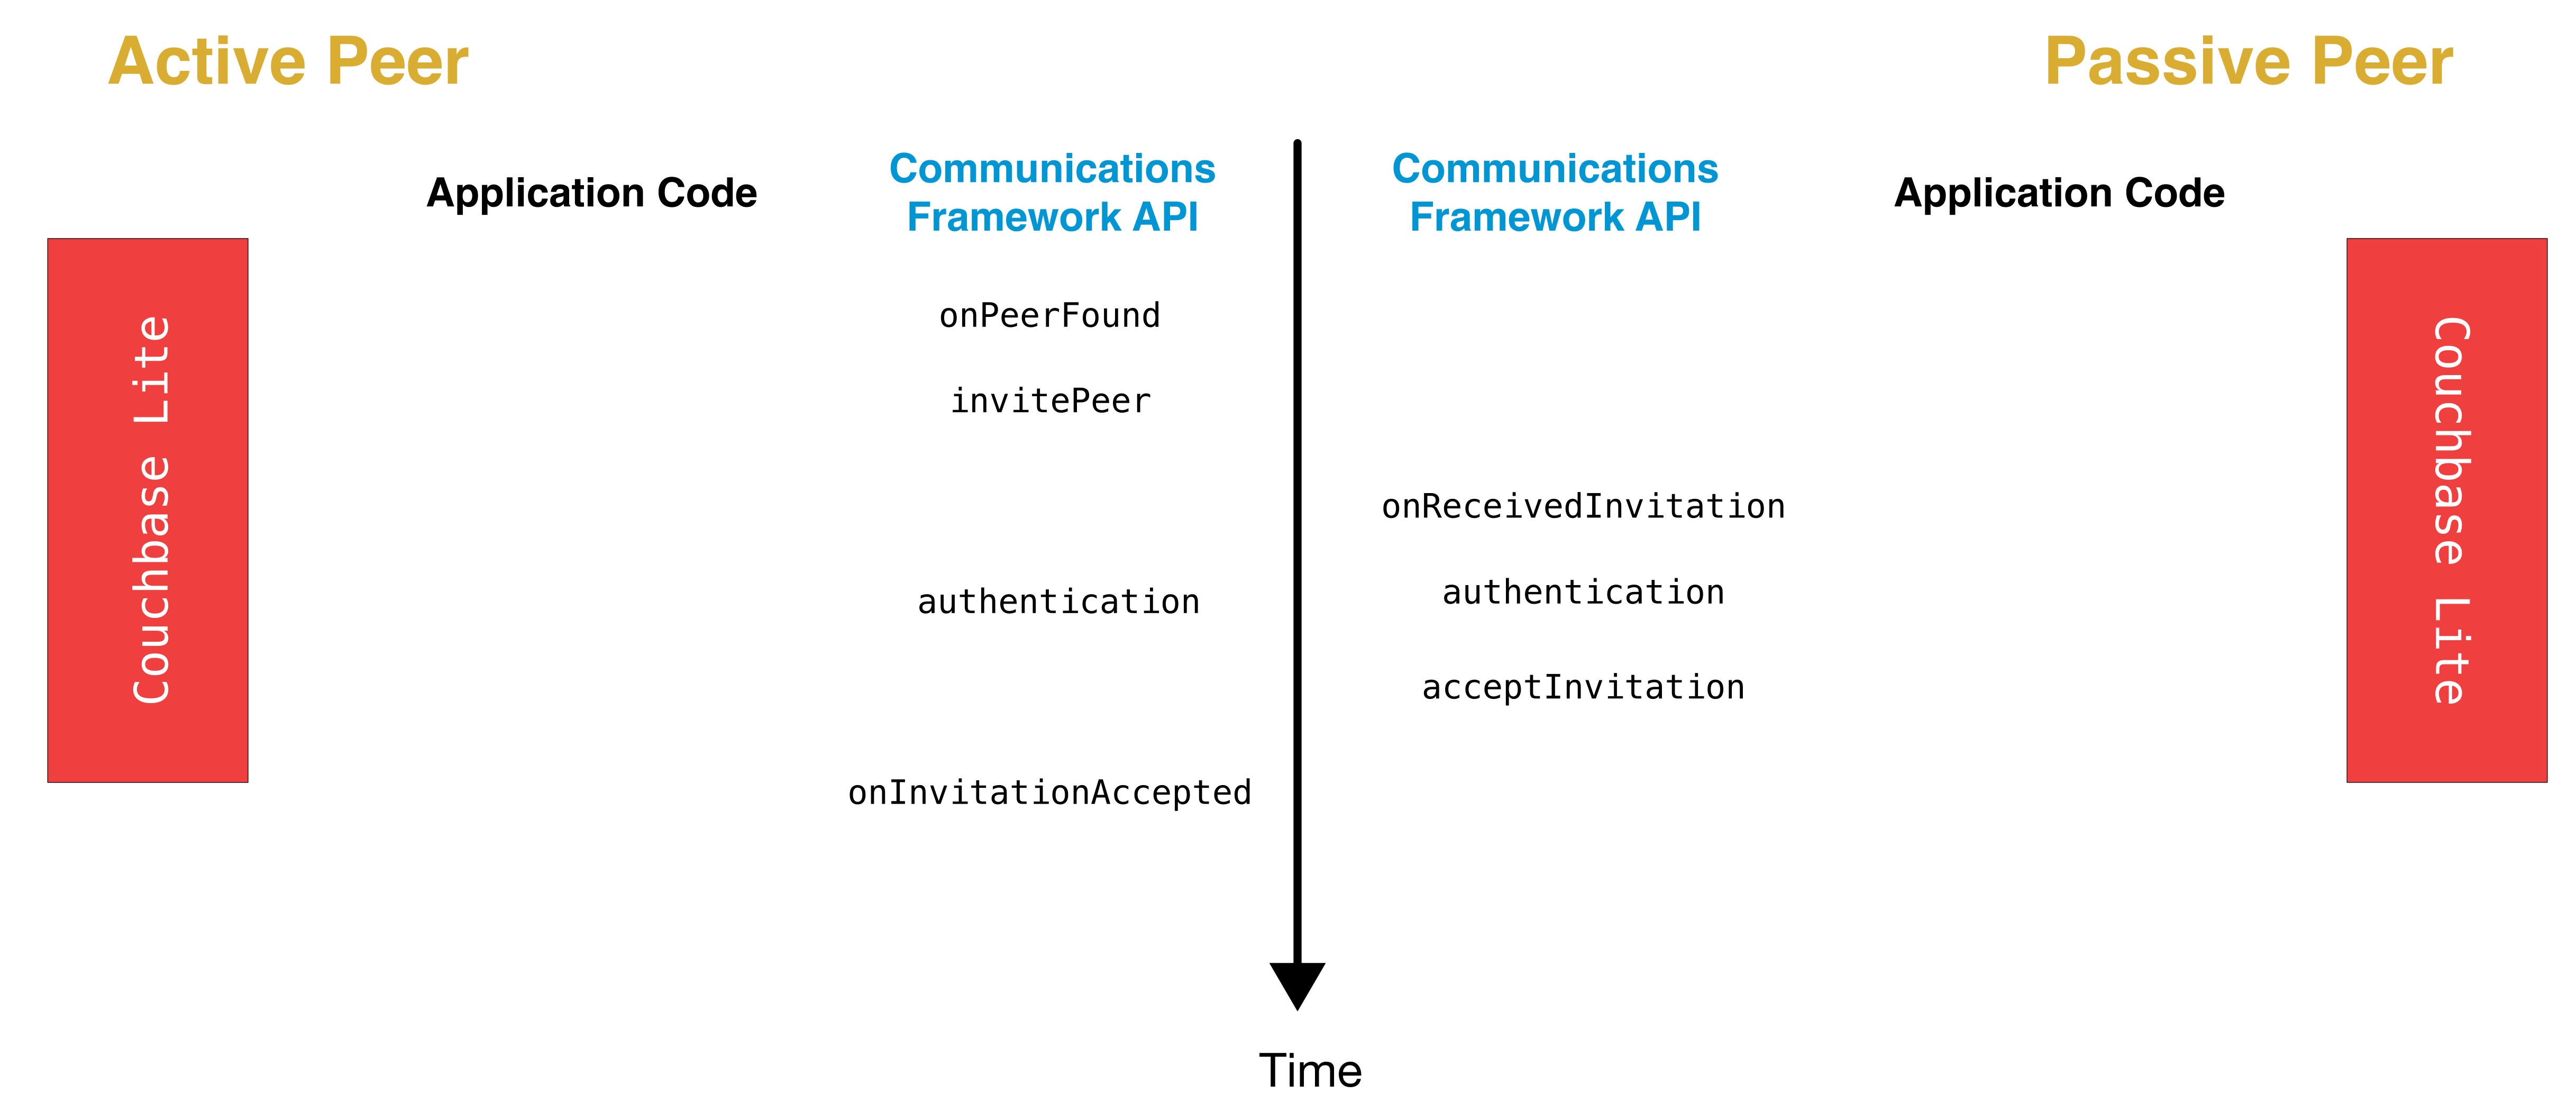
Peer Discovery
Peer discovery is the first step. The communication framework will generally include a peer discovery API for devices to advertise themselves on the network and to browse for other peers.

Active Peer
As shown on the diagram above, the first step is to initialize the Couchbase Lite database.
Passive Peer
In addition to initializing the database, the passive peer must initialize the MessageEndpointListener.
The MessageEndpointListener acts as as a listener for incoming connections.
let database = try! Database(name: "mydb")
let config = MessageEndpointListenerConfiguration(database: database, protocolType: .messageStream)
messageEndpointListener = MessageEndpointListener(config: config)
Peer Selection and Connection Setup
Once a peer device is found, it is the application code’s responsibility to decide whether it should establish a connection with that peer. This step includes inviting a peer to a session and peer authentication.
This is handled by the Communication Framework.
Once the remote peer has been authenticated, the next step is to connect with that peer and initialize the Message Endpoint API.
Replication Setup
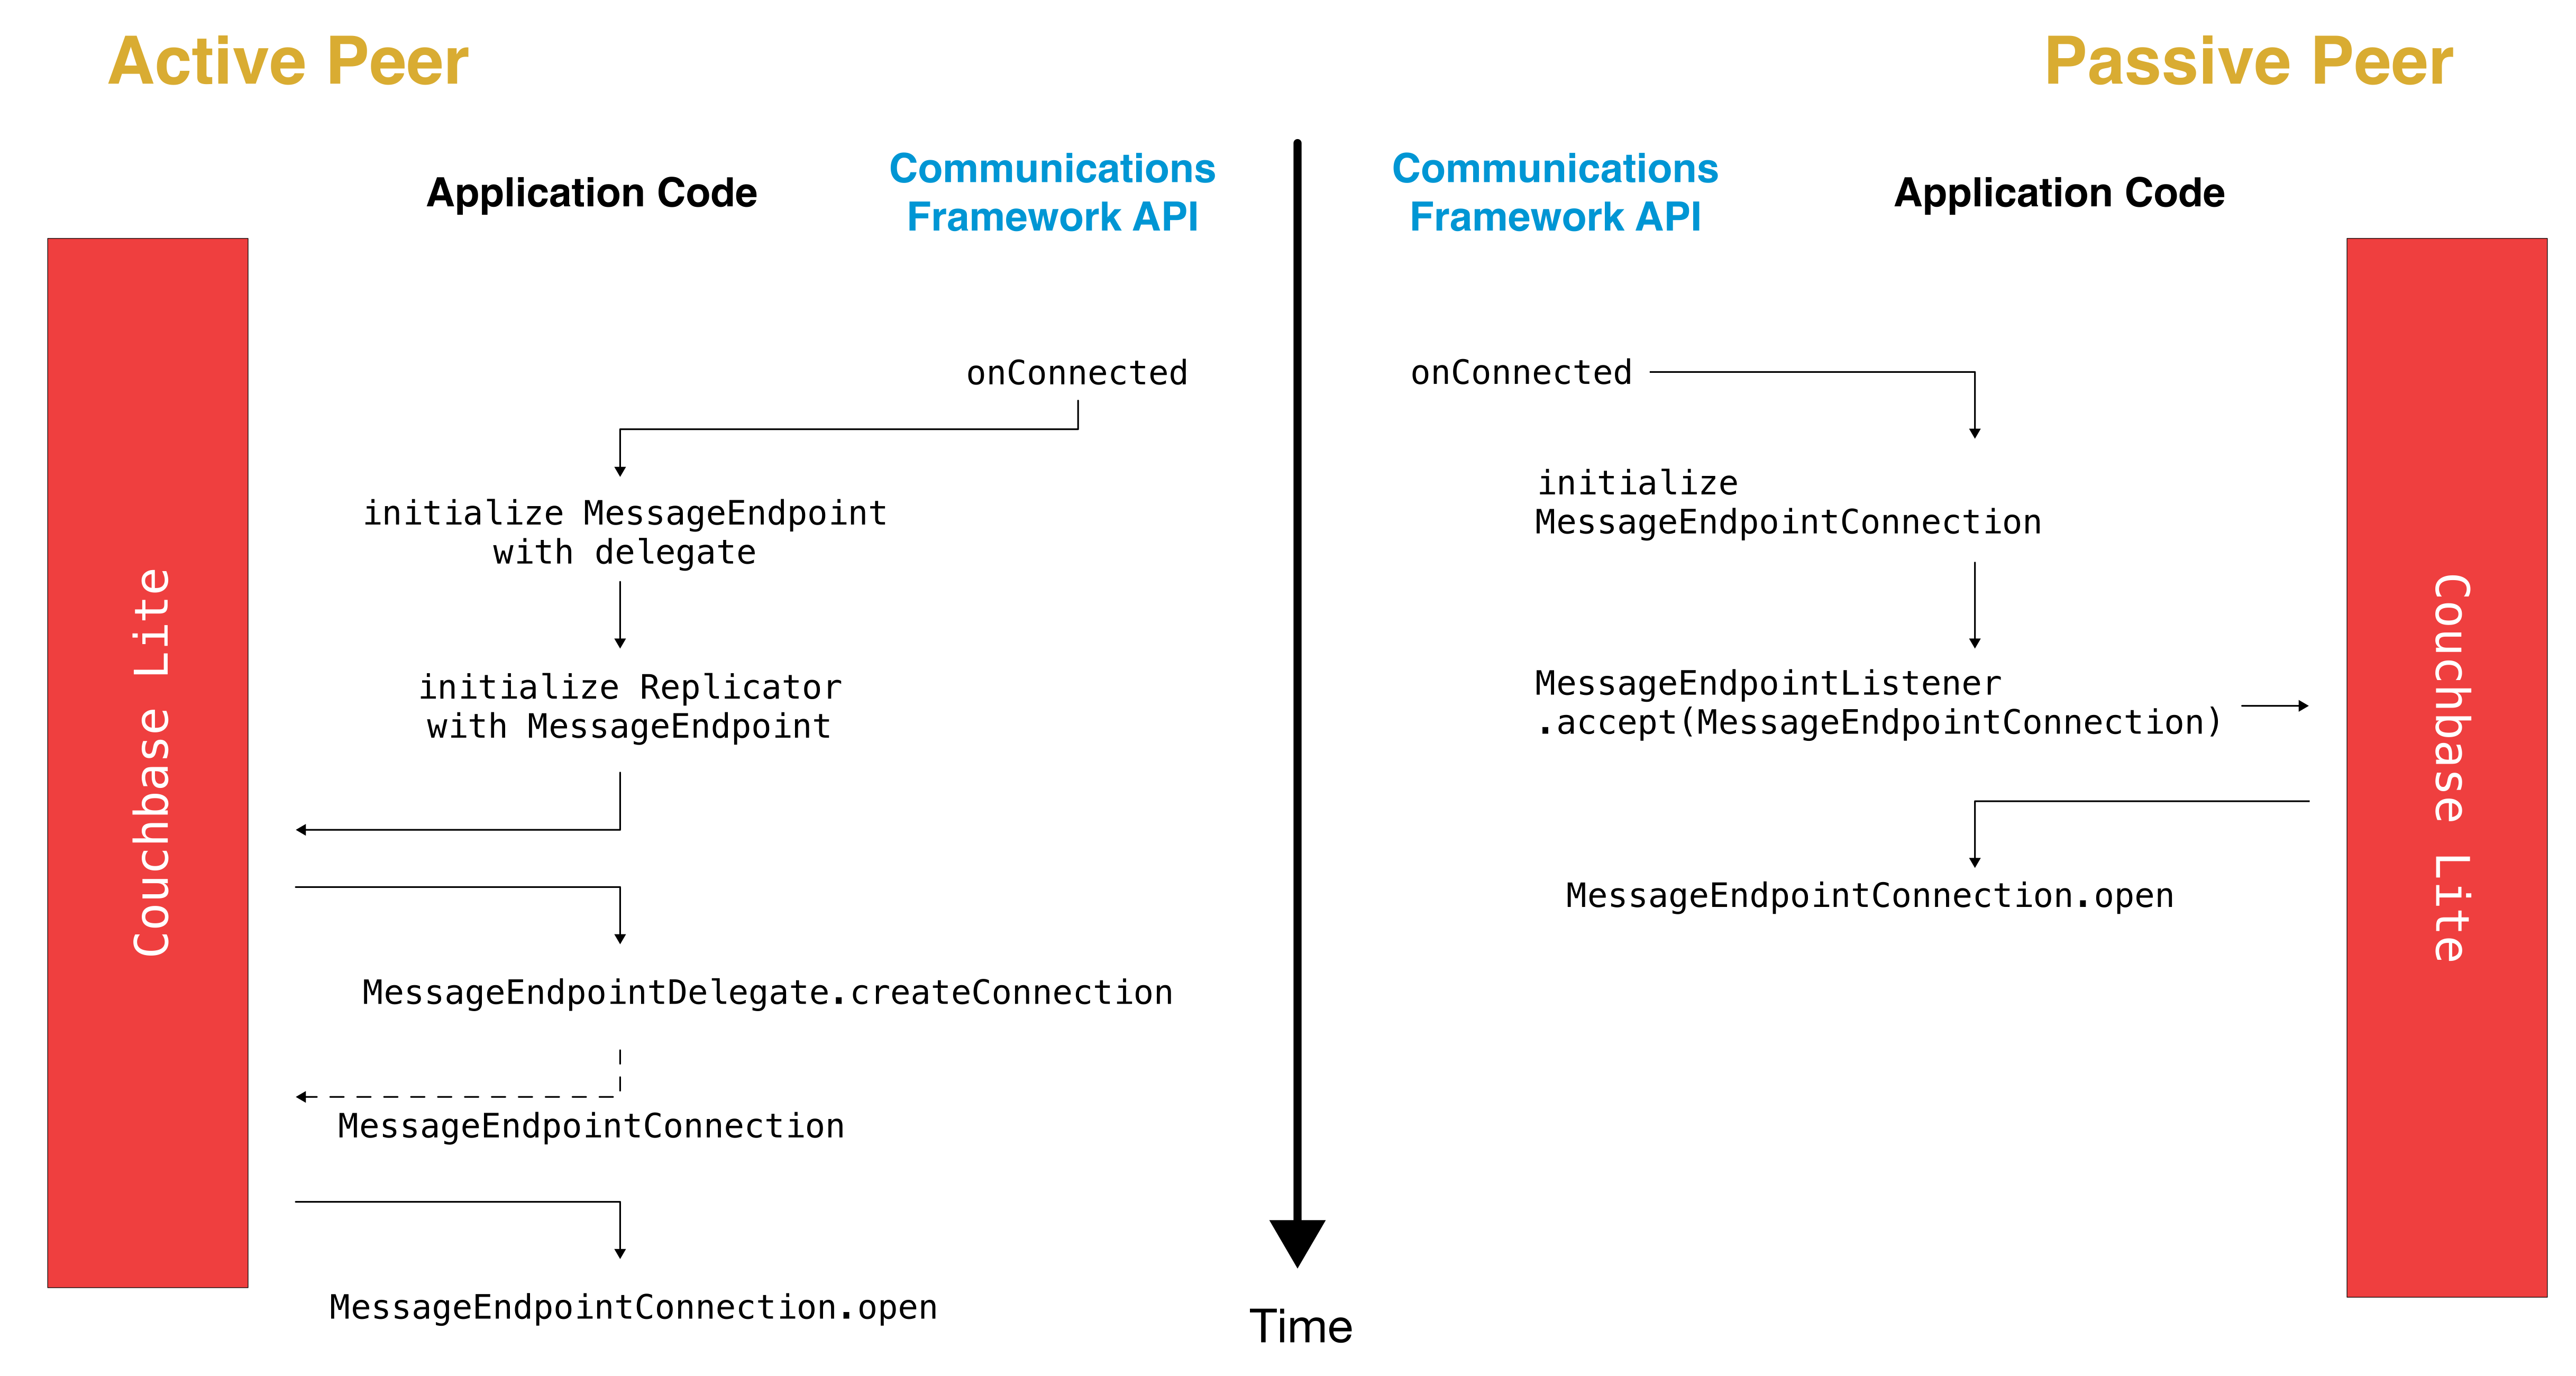
Active Peer
When the connection is established, the active peer must instantiate a MessageEndpoint object corresponding to the remote peer.
let database = try Database(name: "dbname")

// The delegate must implement the `MessageEndpointDelegate` protocol.
let messageEndpointTarget = MessageEndpoint(uid: "UID:123", target: id, protocolType: .messageStream, delegate: self)
The MessageEndpoint initializer takes the following arguments.
-
uid: a unique ID that represents the local active peer. -
target: This represents the remote passive peer and could be any suitable representation of the remote peer. It could be an Id, URL etc. If using the MultiPeerConnectivity Framework, this could be the MCPeerID. -
protocolType: specifies the kind of transport you intend to implement. There are two options.-
The default (
MessageStream) means that you want to "send a series of messages", or in other words the Communication Framework will control the formatting of messages so that there are clear boundaries between messages. -
The alternative (
ByteStream) means that you just want to send raw bytes over the stream and Couchbase should format for you to ensure that messages get delivered in full.Typically, the Communication Framework will handle message assembly and disassembly so you would use the
MessageTypeoption in most cases.
-
-
delegate: the delegate that will implement theMessageEndpointConnectionprotocol.
Then, a Replicator is instantiated with the initialized MessageEndpoint as the target.
let config = ReplicatorConfiguration(database: database, target: messageEndpointTarget)

// Create the replicator object.
let replicator = Replicator(config: config)
// Start the replication.
replicator.start()
Next, Couchbase Lite will call back the application code through the MessageEndpointDelegate.createConnection interface method.
When the application receives the callback, it must create an instance of MessageEndpointConnection and return it.
/* implementation of MessageEndpointDelegate */
func createConnection(endpoint: MessageEndpoint) -> MessageEndpointConnection {
    let connection = ActivePeerConnection() /* implements MessageEndpointConnection */
    return connection
}
Next, Couchbase Lite will call back the application code through the MessageEndpointConnection.open method.
/* implementation of MessageEndpointConnection */
func open(connection: ReplicatorConnection, completion: @escaping (Bool, MessagingError?) -> Void) {
    replicatorConnection = connection
    completion(true, nil)
}
The connection argument is then set on an instance variable.
The application code must keep track of every ReplicatorConnection associated with every MessageEndpointConnection.
The MessageError argument in the completion block is used to specify if the error is recoverable or not.
If it is a recoverable error, the replicator will kick off a retry process which will result to creating a new MessageEndpointConnection instance.
Passive Peer
The first step after connection establishment on the passive peer is to initialize a new MessageEndpointConnection and pass it to the listener.
This tells the listener to accept incoming data from that peer.
let connection = PassivePeerConnection() /* implements MessageEndpointConnection */
messageEndpointListener?.accept(connection: connection)
messageEndpointListener is the instance of the MessageEndpointListener that was created in the first step (Peer Discovery)
Couchbase Lite will then call back the application code through the MessageEndpointConnection.open method.
/* implementation of MessageEndpointConnection */
func open(connection: ReplicatorConnection, completion: @escaping (Bool, MessagingError?) -> Void) {
    replicatorConnection = connection
    completion(true, nil)
}
The connection argument is then set on an instance variable.
The application code must keep track of every ReplicatorConnection associated with every MessageEndpointConnection.
At this point, the connection is established and both peers are ready to exchange data.
Push/Pull Replication
Typically, an application needs to send data and receive data. Directionality of the replication could be any of the following.
-
Push only: The data is pushed from the local database to the remote database.
-
Pull only: The data is pulled from the remote database to the local database.
-
Push and Pull: The data is exchanged both ways.
Usually, the remote is a Sync Gateway database which is identified through a URL. In the context of peer-to-peer syncing, the remote is another Couchbase Lite database.
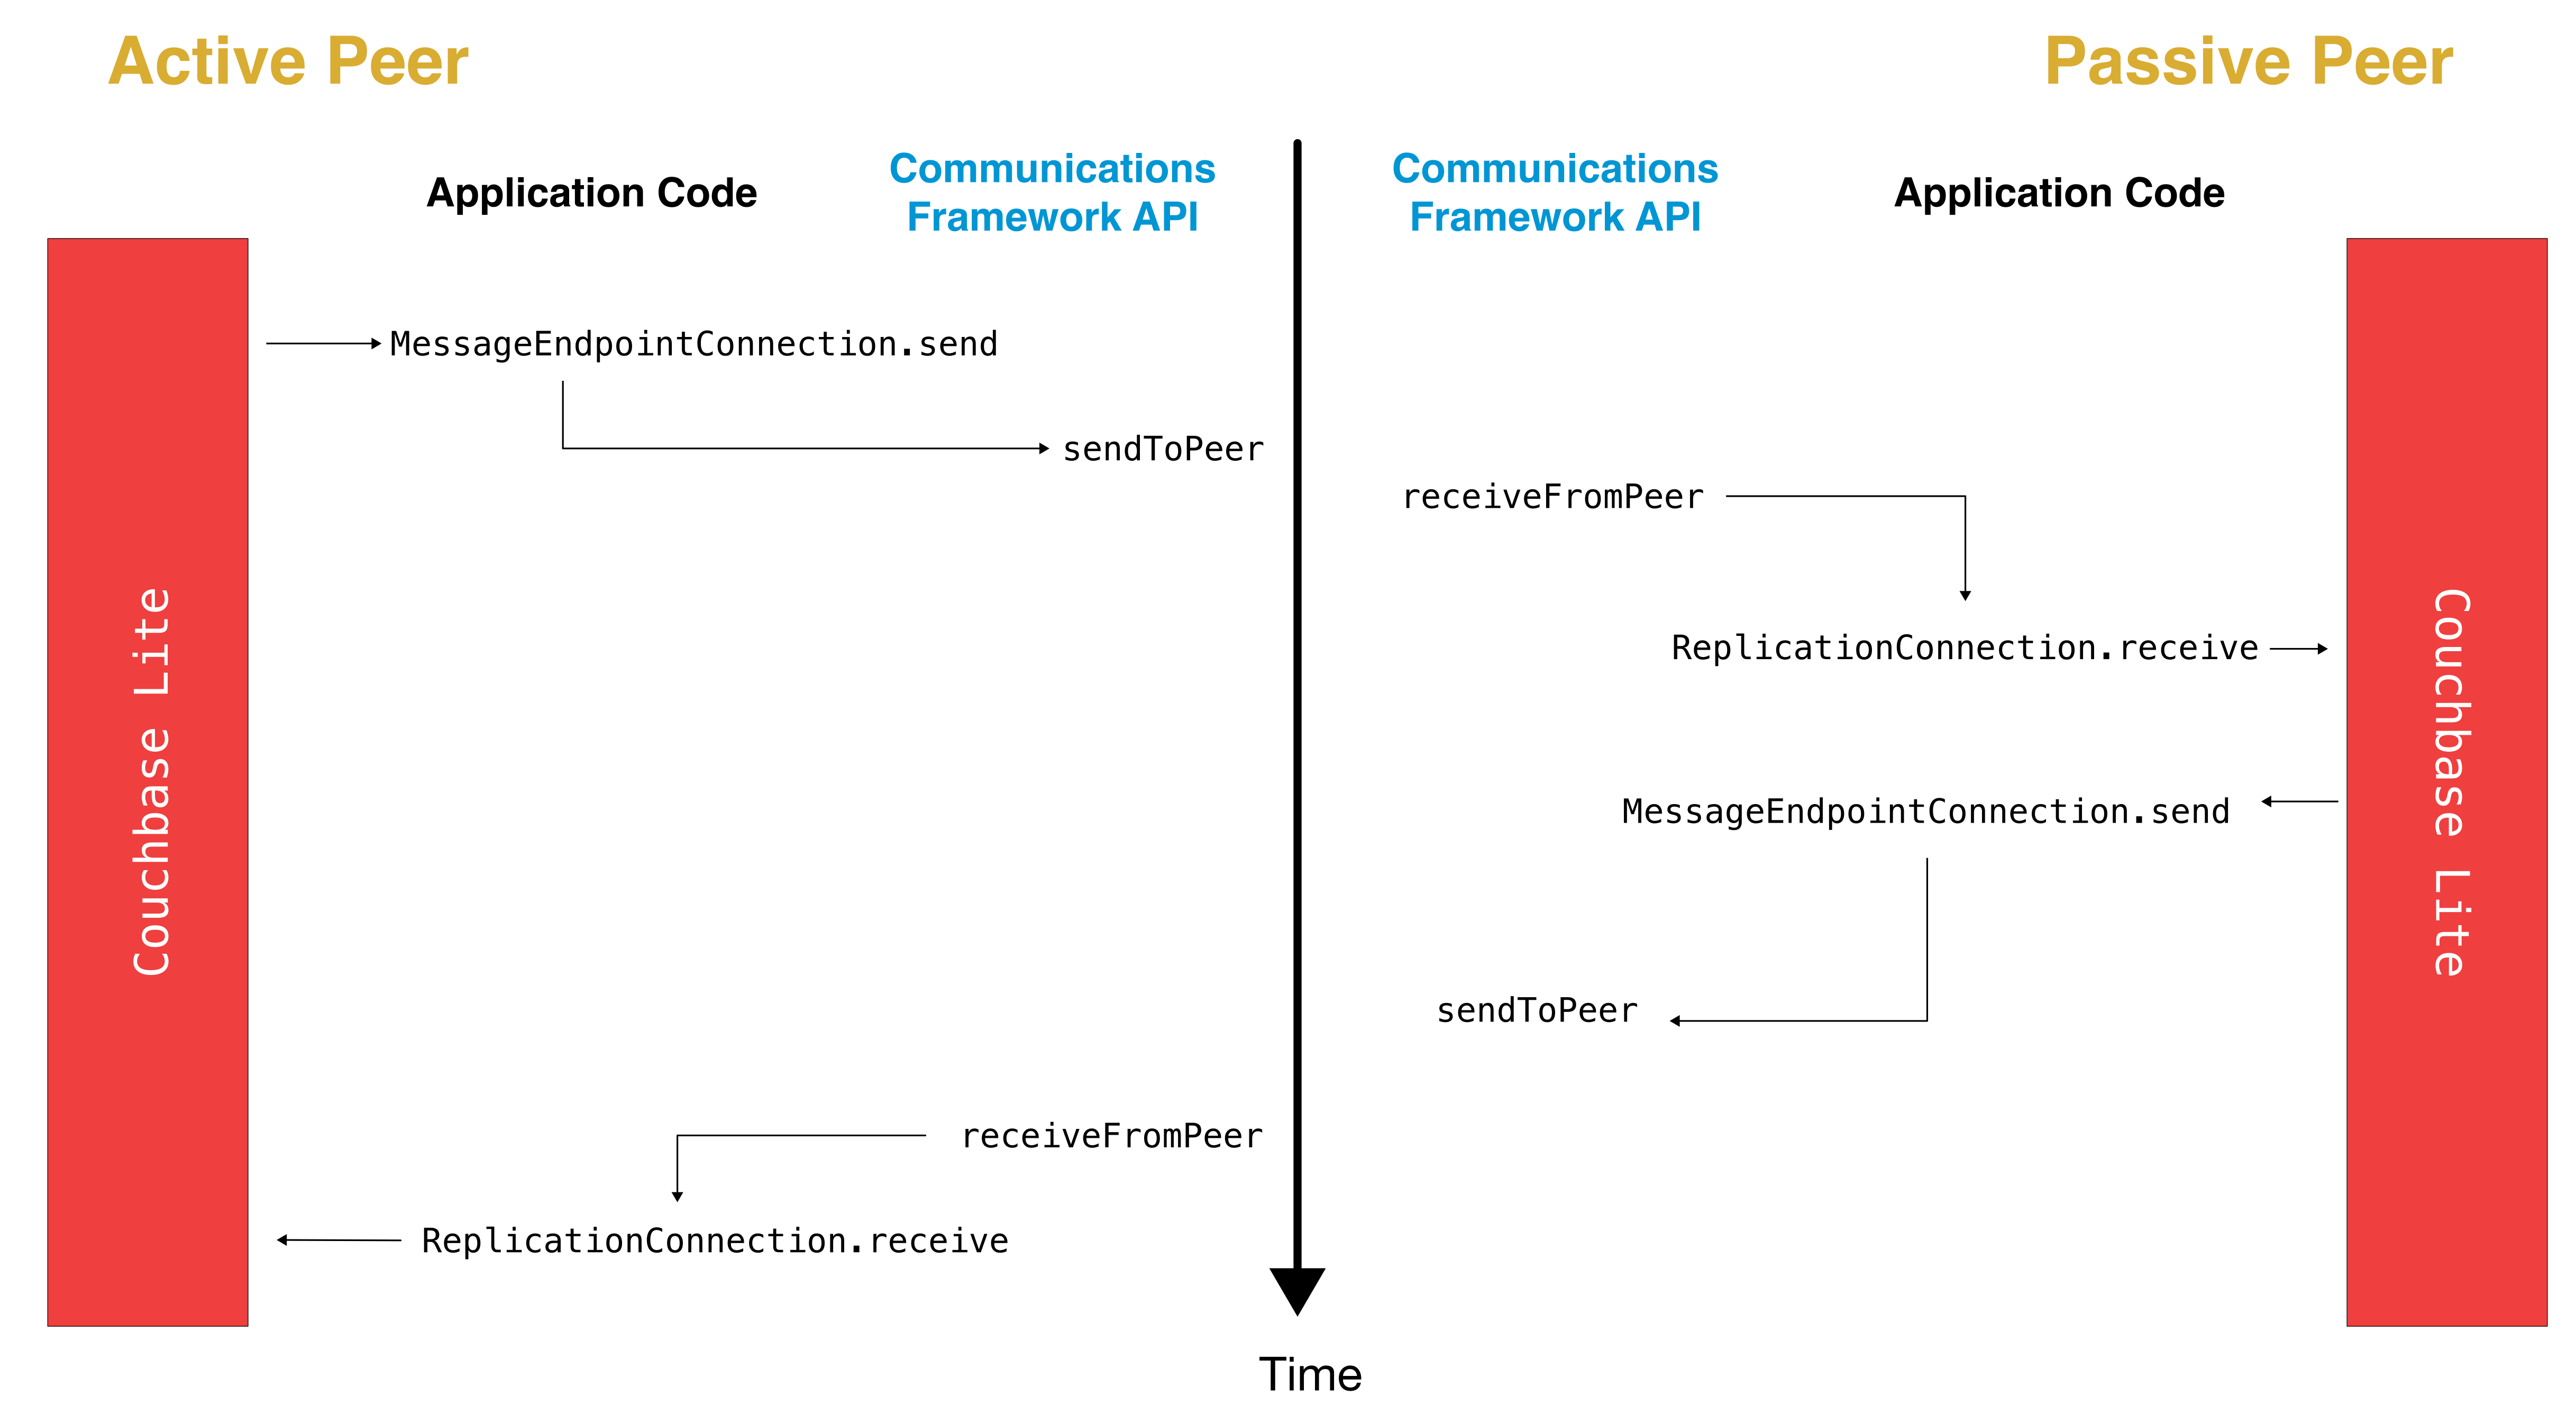
The replication lifecycle is handled through the MessageEndpointConnection.
Active Peer
When Couchbase Lite calls back the application code through the MessageEndpointConnection.send method, you should send that data to the other peer using the communication framework.
/* implementation of MessageEndpointConnection */
func send(message: Message, completion: @escaping (Bool, MessagingError?) -> Void) {
    var data = message.toData()
    /* send the data to the other peer */
    /* ... */
    /* call the completion handler once the message is sent */
    completion(true, nil)
}
Once the data is sent, call the completion block to acknowledge the completion.
You can use the MessageError in the completion block to specify if the error is recoverable or not.
If it is a recoverable error, the replicator will kick off a retry process which will result to creating a new MessageEndpointConnection.
When data is received from the passive peer via the Communication Framework, you call the ReplicatorConnection.receive method.
let message = Message.fromData(data)
replicatorConnection?.receive(messge: message)
The replication connection’s receive method is called which then processes the data in order to persist it to the local database.
Passive Peer
As in the case of the active peer, the passive peer must implement the MessageEndpointConnection.send method to send data to the other peer.
/* implementation of MessageEndpointConnection */
func send(message: Message, completion: @escaping (Bool, MessagingError?) -> Void) {
    var data = Data()
    data.append(message.toData())
    /* send the data to the other peer */
    /* ... */
    /* call the completion handler once the message is sent */
    completion(true, nil)
}
Once the data is sent, call the completion block to acknowledge the completion.
You can use the MessageError in the completion block to specify if the error is recoverable or not.
If it is a recoverable error, the replicator will kick off a retry process which will result to creating a new MessageEndpointConnection.
When data is received from the active peer via the Communication Framework, you call the ReplicatorConnection.receive method.
let message = Message.fromData(data)
replicatorConnection?.receive(messge: message)
Connection Teardown
When a peer disconnects from a peer-to-peer network, all connected peers are notified. The disconnect notification is a good opportunity to close and remove a replication connection. The steps to teardown the connection are slightly different depending on whether it is the active or passive peer that disconnects first. We will cover each case below.
Initiated by Active Peer

Active Peer
When an active peer disconnects, it must call the ReplicatorConnection.close method.
replicatorConnection?.close(error: nil)Then, Couchbase Lite will call back your code through the MessageEndpointConnection.close to give the application a chance to disconnect with the Communication Framework.
/* implementation of MessageEndpointConnection */
func close(error: Error?, completion: @escaping () -> Void) {
    /* disconnect with communications framework */
    /* ... */
    /* call completion handler */
    completion()
}
Passive Peer
When the passive peer receives the corresponding disconnect notification from the Communication Framework, it must call the ReplicatorConnection.close method.
replicatorConnection?.close(error: nil)Then, Couchbase Lite will call back your code through the MessageEndpointConnection.close to give the application a chance to disconnect with the Communication Framework.
/* implementation of MessageEndpointConnection */
func close(error: Error?, completion: @escaping () -> Void) {
    /* disconnect with communications framework */
    /* ... */
    /* call completion handler */
    completion()
}
Initiated by Passive Peer
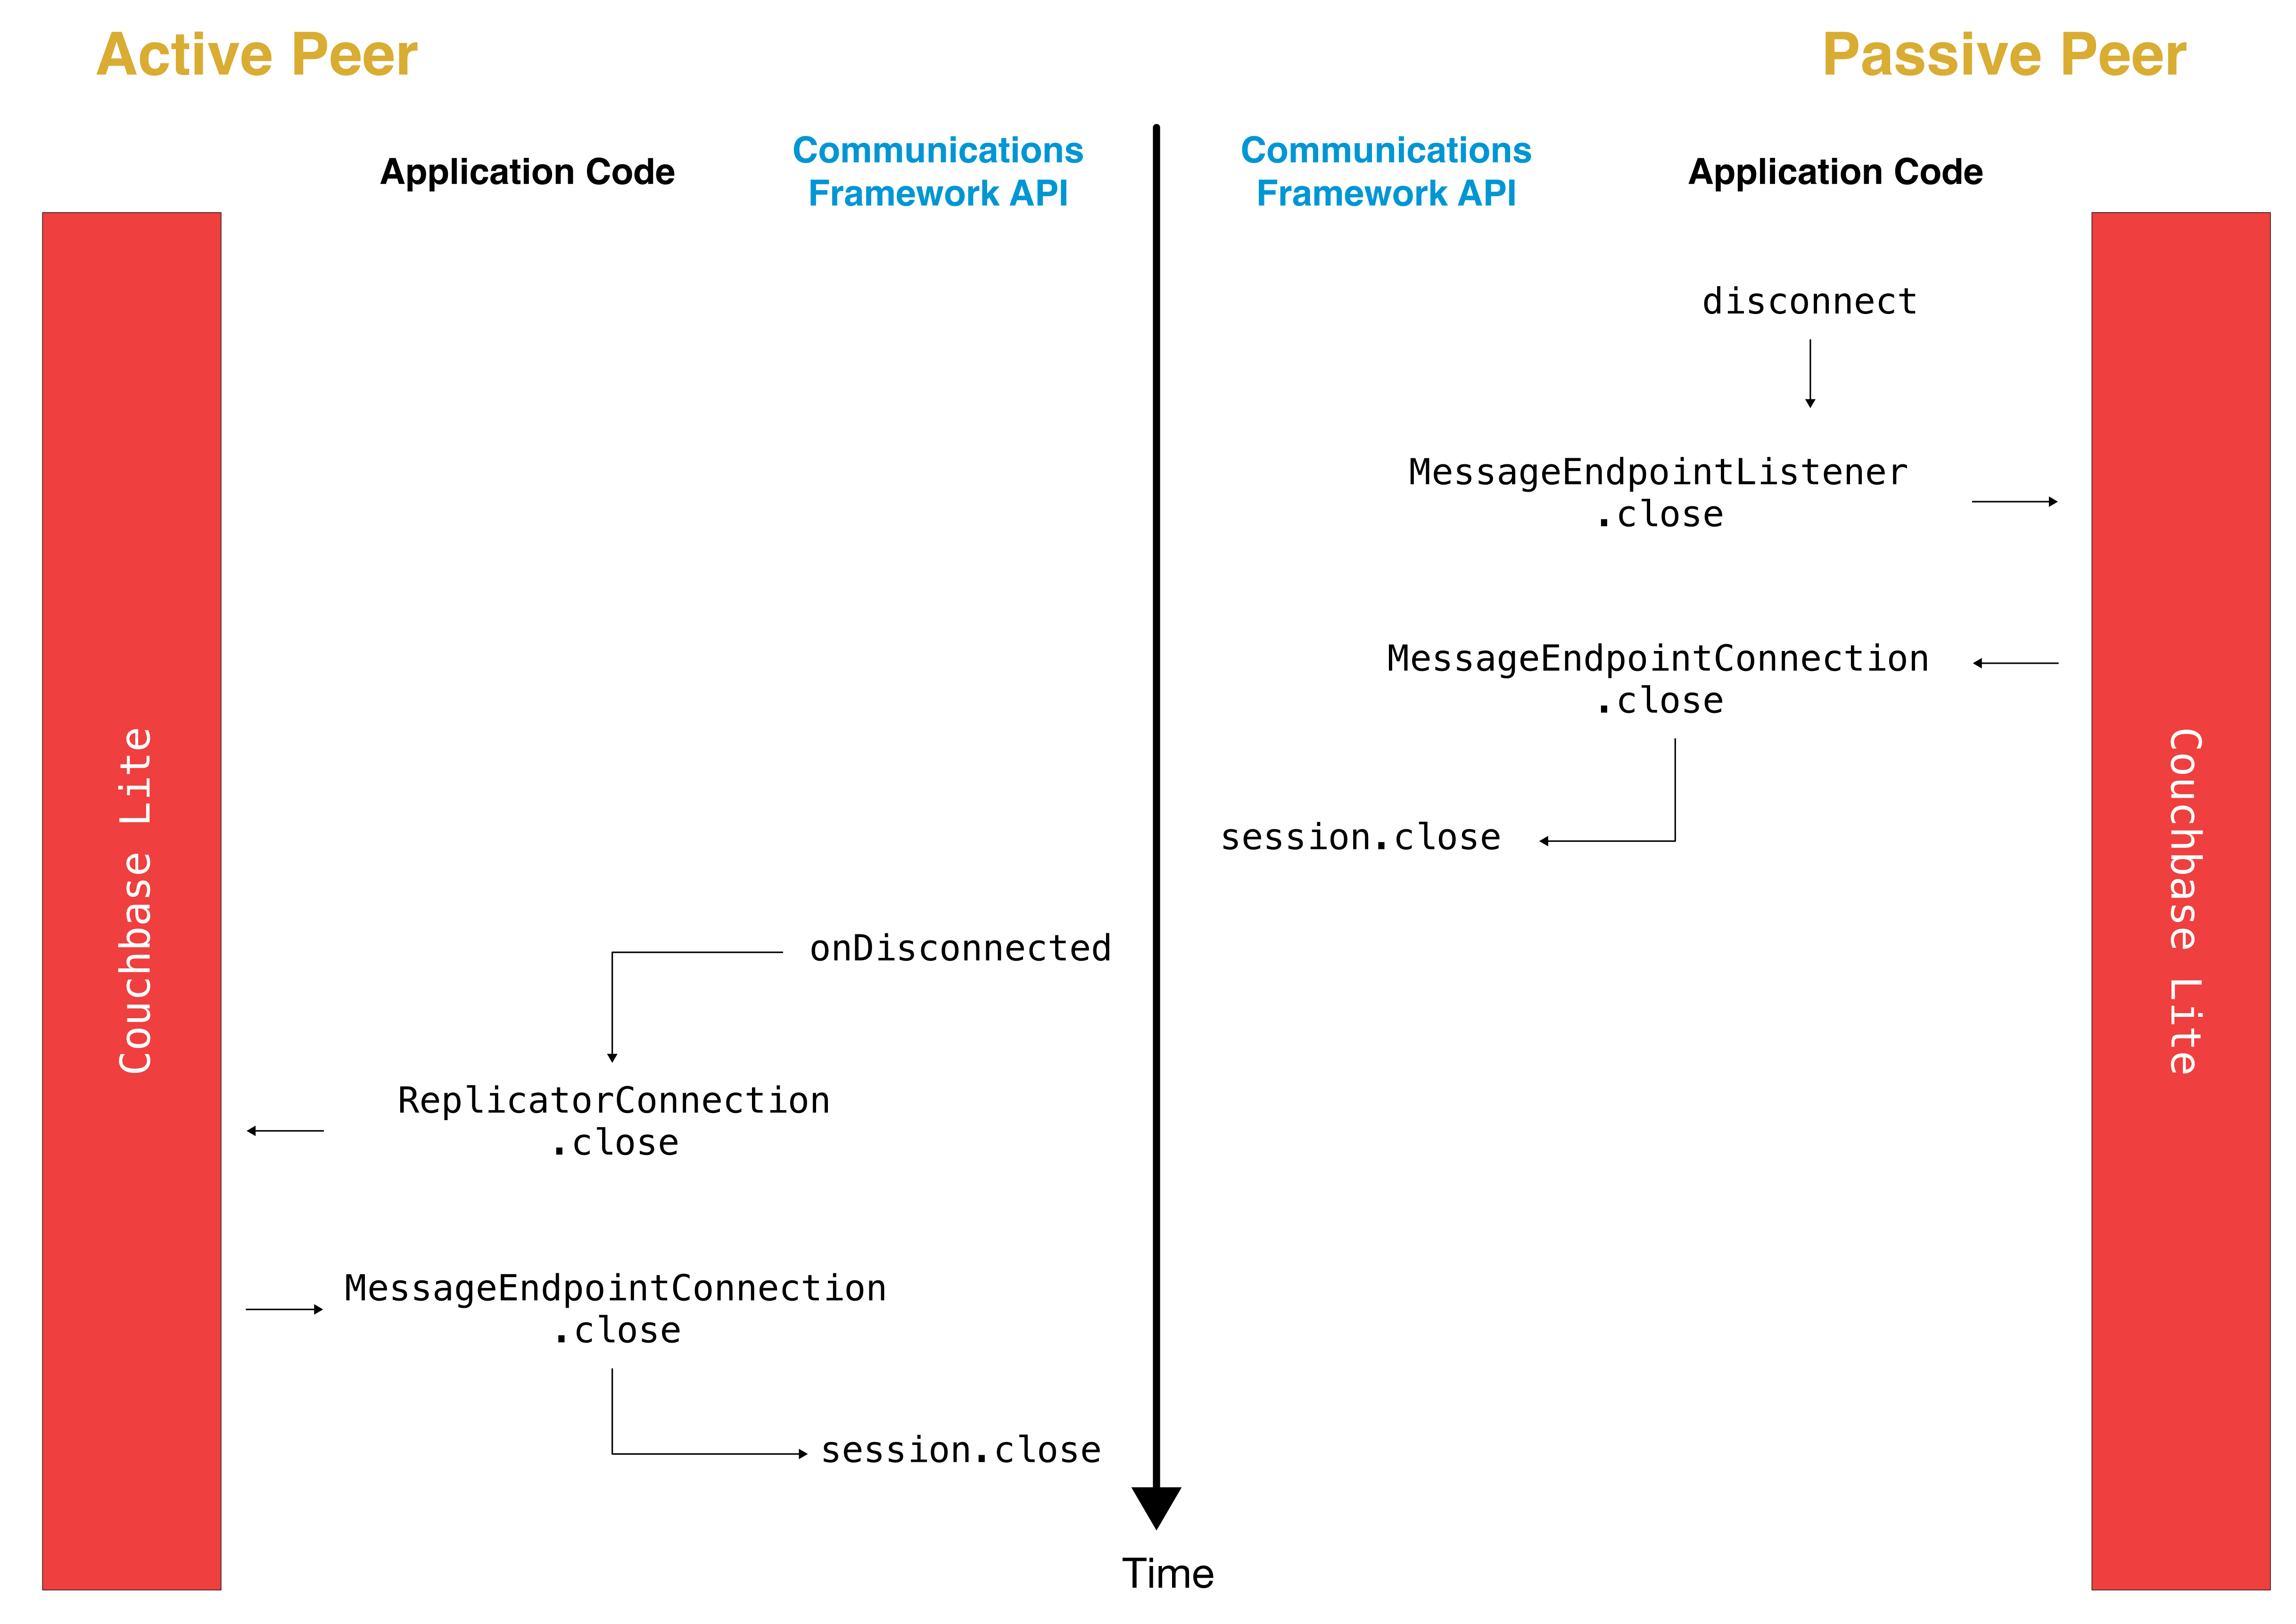
Passive Peer
When the passive disconnects, it must class the MessageEndpointListener.closeAll method.
messageEndpointListener?.closeAll()Then, Couchbase Lite will call back your code through the MessageEndpointConnection.close to give the application a chance to disconnect with the Communication Framework.
/* implementation of MessageEndpointConnection */
func close(error: Error?, completion: @escaping () -> Void) {
    /* disconnect with communications framework */
    /* ... */
    /* call completion handler */
    completion()
}
Active Peer
When the active peer receives the corresponding disconnect notification from the Communication Framework, it must call the ReplicatorConnection.close method.
replicatorConnection?.close(error: nil)Then, Couchbase Lite will call back your code through the MessageEndpointConnection.close to give the application a chance to disconnect with the Communication Framework.
/* implementation of MessageEndpointConnection */
func close(error: Error?, completion: @escaping () -> Void) {
    /* disconnect with communications framework */
    /* ... */
    /* call completion handler */
    completion()
}
Thread Safety
The Couchbase Lite API is thread safe except for calls to mutable objects: MutableDocument, MutableDictionary and MutableArray.
Release Notes
2.1
-
#2127 CBLReplicator always runs on main queue
-
#1926 Swift Replicator.addChangeListener crashes
-
#2140 2.0 : TIC Read Status 1:57 error spam
-
#2149 Swift DictionaryObject and ArrayObject not having toMutable() method
-
#2162 2.1 DB1: Crash when inserting image Blobs to objects in embedded array in Swift
-
#2188 Replicator not getting stopped when using MessageEndpoint
2.0.2
-
Support for Log redaction of sensitive information when logging is enabled.
2.0.0
-
#1701 2:0 swift expression based query returning empty results
-
#1836 2.0: Database Listener callbacks not always getting called on main thread
-
#1854 2.0 : Dictionary, Array, and Fragment have duplicate definitions
-
#1862 2.0: CBLQueryExpression "and:" and "or:" methods cause syntax errors in Obj-C++
-
#2005 2.0: Make CBLDatabase query/replication tracking thread-safe
-
#2035 Cross Join Not Returning expected results
-
#2061 Swift 2.0: LiteCore error trying to copy prebuilt DB
-
#2085 Crashed in CBLWebSocket
-
#2094 TestSelfSignedSSLFailure_SG failed on iOS 10.2
-
#2104 Set Immutable Dictionary or Array to Document causes toDictionary() to crash in Swift