Getting Started
A Couchbase-Elasticsearch data-replication system consists of three principal components:
-
a Couchbase Server cluster of one or more nodes
-
an Elasticsearch cluster of one or more nodes
-
the Elasticsearch Transport Plug-in, installed in the Elasticsearch environment.
This section provides step-by-step instructions to install the Couchbase Elasticsearch plug-in.
Plug-in prerequisites
-
Java (see installation guide)
-
Download and install Elasticsearch <= 5.x (see installation guide, Elasticsearch 6.0 is not supported by the plug-in)
-
Download and install Couchbase Server >= 3.0 (see installation guide)
Verify the Elasticsearch cluster is up and running (the default port is 9200).
$ curl localhost:9200

{
  "name" : "K3RqW4F",
  "cluster_name" : "elasticsearch",
  "cluster_uuid" : "Bw-Ta0wDTcekzQIhXZHGkg",
  "version" : {
    "number" : "5.6.5",
    "build_hash" : "6a37571",
    "build_date" : "2017-12-04T07:50:10.466Z",
    "build_snapshot" : false,
    "lucene_version" : "6.6.1"
  },
  "tagline" : "You Know, for Search"
}
Verify that Couchbase Server is running.
$ curl localhost:8092

{"couchdb":"Welcome","version":"v4.5.1-60-g3cf258d","couchbase":"5.0.2-5506-community"}
Installation
Navigate to the Elasticsearch installation directory.
$ cd /usr/share/elasticsearchDownload and install the plug-in package.
$ bin/elasticsearch-plugin install https://github.com/couchbaselabs/couchbase-elasticsearch-connector/releases/download/3.0.0-cypress/elasticsearch-transport-couchbase-3.0.0-cypress-es5.6.4.zipReplace the plug-in URL with the one that matches your Elasticsearch version; all URLs can be found on the releases page.
If you’re using Elasticsearch 2.x, the command to install plug-ins is bin/plugin instead of bin/elastichsearch-plugin.
|
When the installation is successful, the message “Installed transport-couchbase into /usr/share/elasticsearch/plugins/transport/couchbase” will be logged.
Configuration
Open the Elasticsearch configuration file (/etc/elasticsearch/elasticsearch.yml) and add the following to the end of the file.
couchbase.username: <USERNAME>
couchbase.password: <PASSWORD>
couchbase.maxConcurrentRequests: 1024
The username and password credentials will be used again later when configuring Couchbase Server.
Still in the /usr/share/elasticsearch directory, configure the Elasticsearch plug-in with the following curl command.
$ curl -X PUT http://localhost:9200/_template/couchbase -d @plugins/transport-couchbase/couchbase_template.jsonWhen successful, the configuration-routine provides the following response: {"acknowledged":true}.
Create an Elasticsearch index to receive the data from the Couchbase bucket. Later, when configuring XDCR, the "remote bucket name" should match the Elasticsearch index name.
$ curl -X PUT http://localhost:9200/travel-sample

{"acknowledged":true}
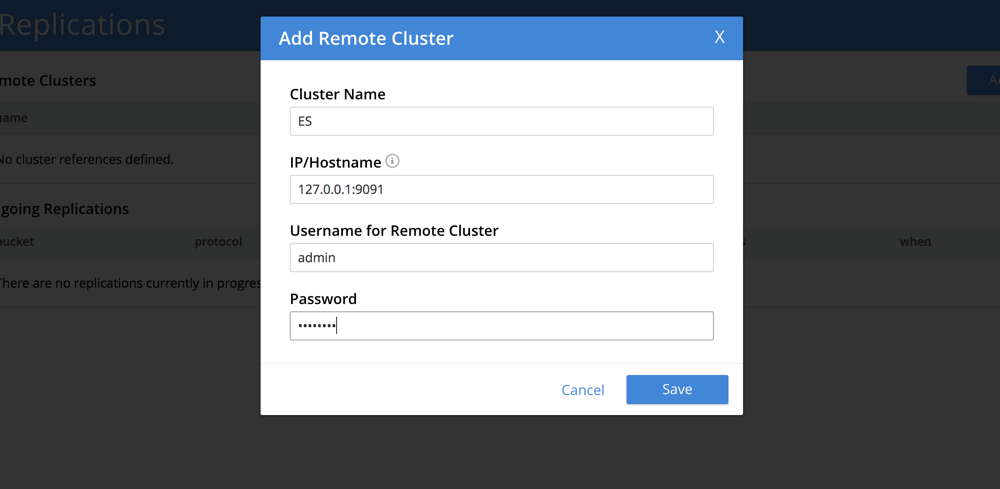
Now to configure Couchbase Server, open the Couchbase Web Console and select .
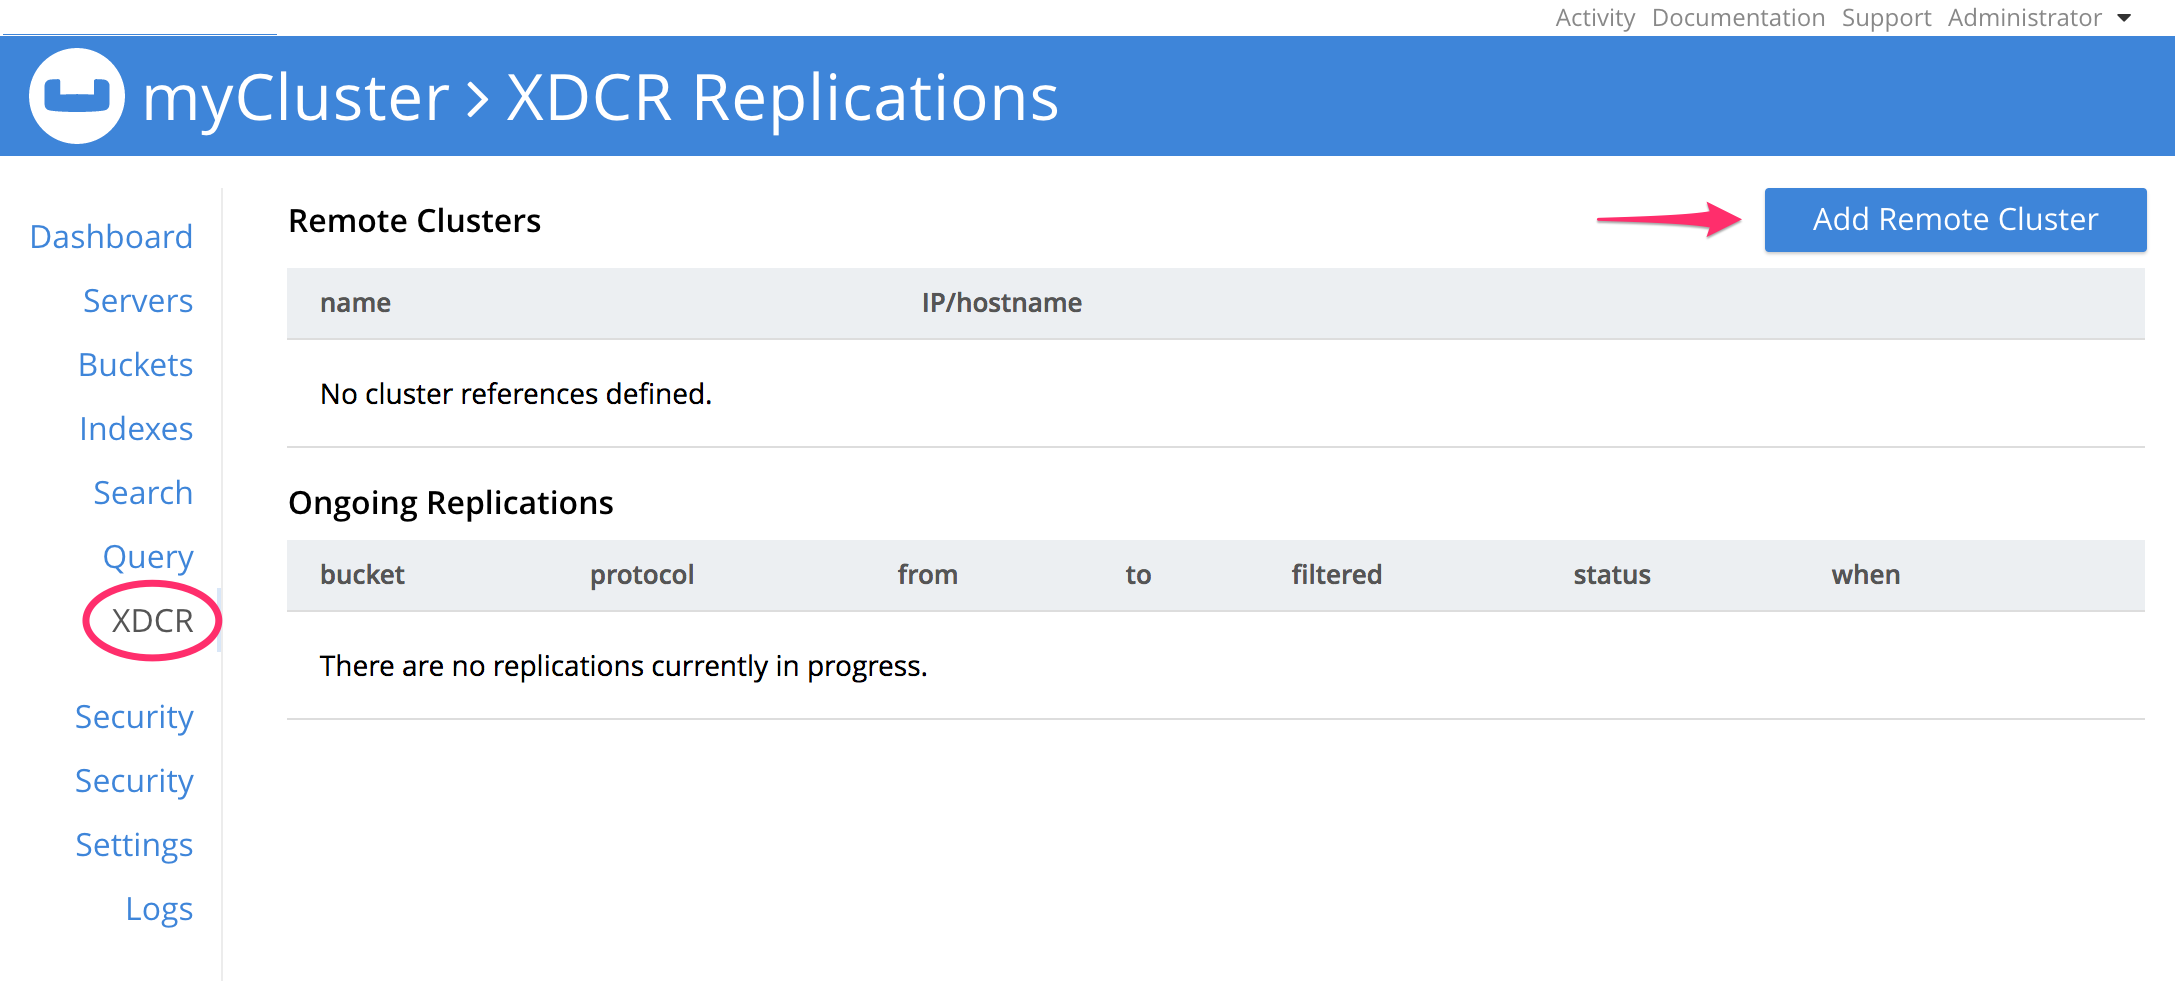
In the dialog, enter the Cluster Name of your choice, the IP/hostname and port number where the Elasticsearch cluster is running (the Elasticsearch plug-in listens on port 9091 by default) and the Username/Password previously stored in elasticsearch.yml.
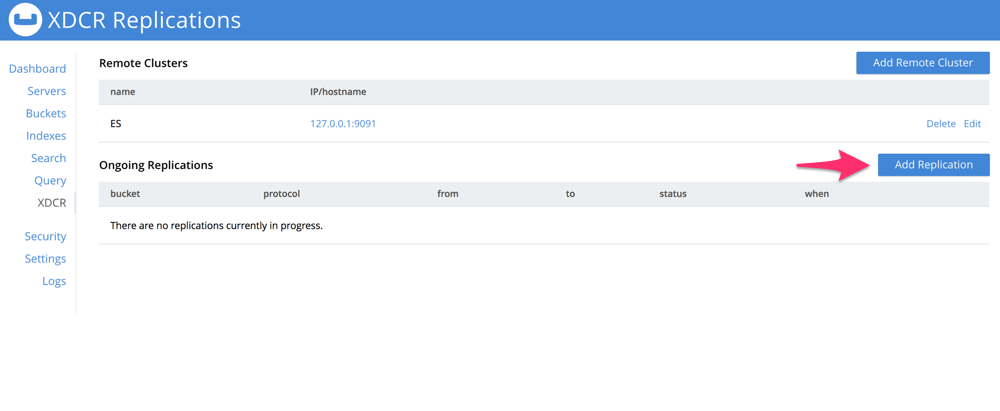
Next, select the Add Replication option.
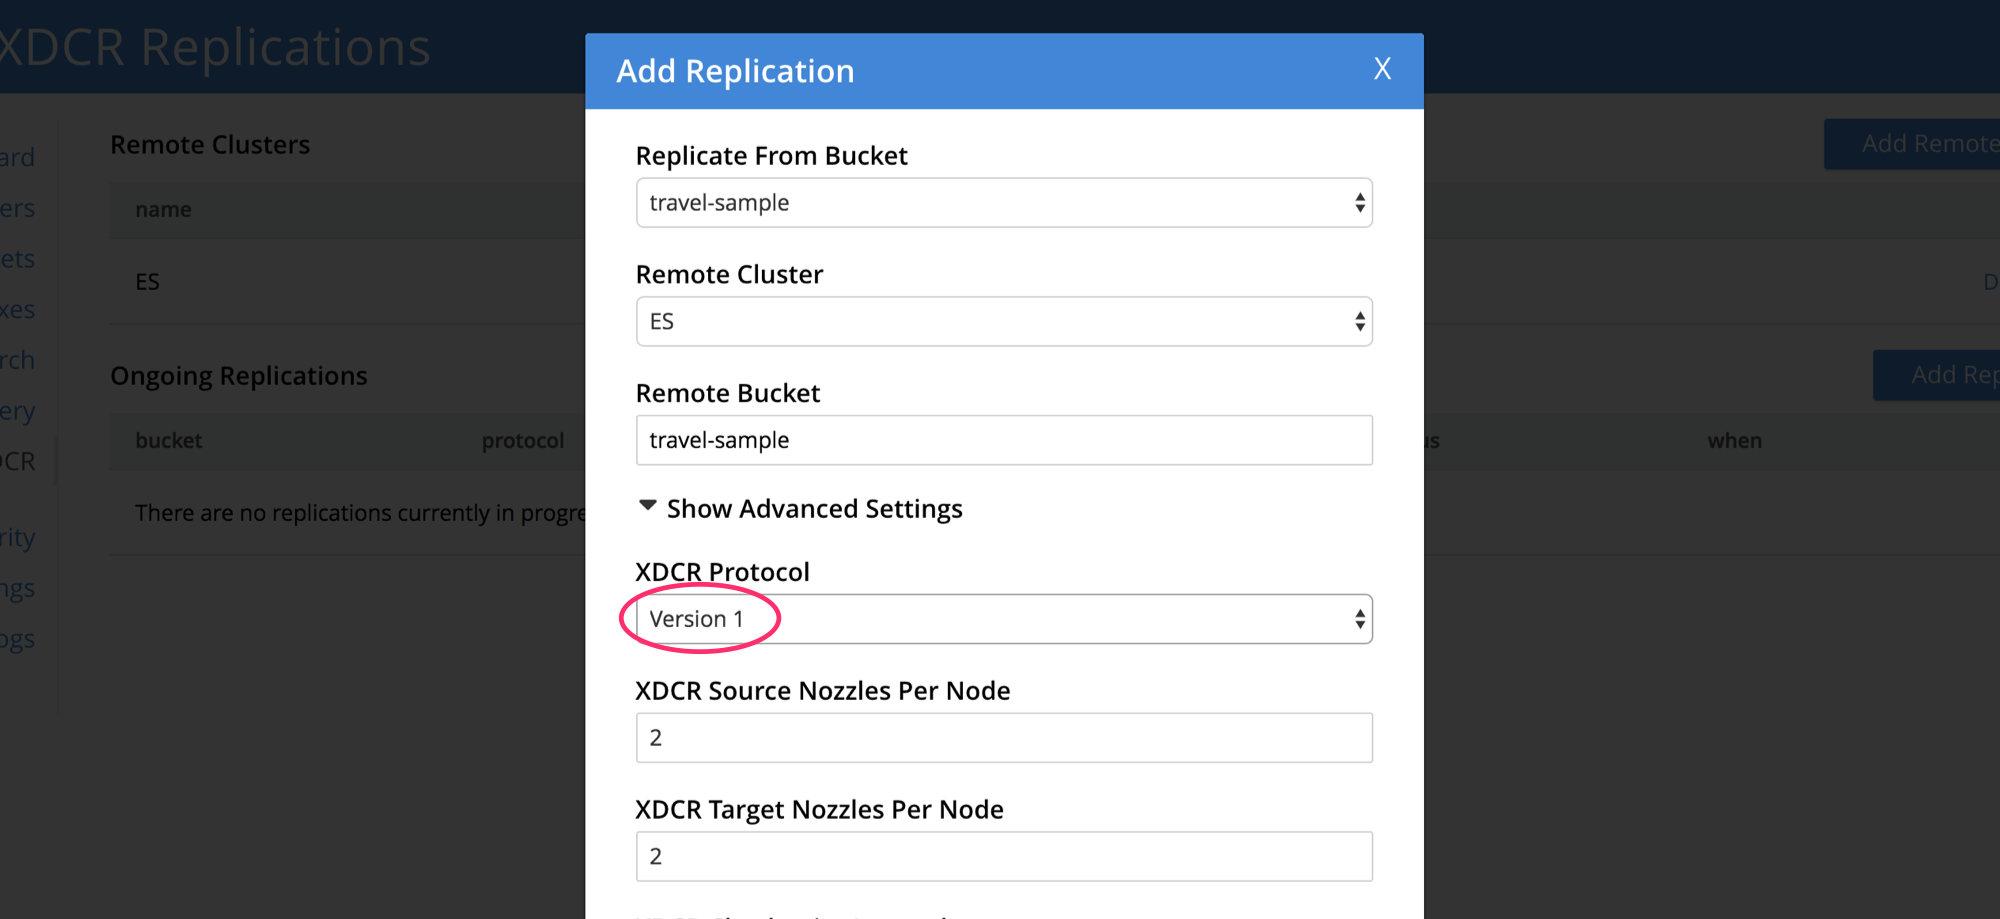
On the pop-up window, enter the origin bucket, the remote cluster, and remote bucket (in this case it’s the index that was created earlier). Also make sure that the XDCR Protocol version is set to 1 and that the XDCR Optimistic Replication Threshold is set to the maximum value of 20971520 for optimal performance. Then click Save.
Now that the replication is up and running, you can run full-text search queries on the Elasticsearch node.
$ curl localhost:9200/travel-sample/_search?q=san+francisco

{
    "took":5,
    "timed_out":false,
    "_shards":{"total":5,"successful":5,"skipped":0,"failed":0},
    "hits":{
        "total":1599,
        "max_score":11.965878,
        "hits":[
            {"_index":"travel-sample","_type":"couchbaseDocument","_id":"landmark_36047","_score":11.965878,"_source":{"meta":{"rev":"1-1508c18bdbb400000000000002000000","flags":33554432,"expiration":0,"id":"landmark_36047"}}},
            {"_index":"travel-sample","_type":"couchbaseDocument","_id":"landmark_25611","_score":11.905596,"_source":{"meta":{"rev":"1-1508c18bb43400000000000002000000","flags":33554432,"expiration":0,"id":"landmark_25611"}}},
            {"_index":"travel-sample","_type":"couchbaseDocument","_id":"landmark_25712","_score":11.905596,"_source":{"meta":{"rev":"1-1508c18bb61e00000000000002000000","flags":33554432,"expiration":0,"id":"landmark_25712"}}}
            ...
        ]
    }
}
Let’s take a moment to discuss some properties in the response object:
-
The
tookparameter indicates the number of milliseconds required for the search; while fields within the_shardsobject indicate how many Elasticsearch shards were available for search, how many were accessed successfully, and how many unsuccessfully. -
The
totalfield indicates the total number of items. Amax_scoreis provided, to indicate Elasticsearch’s estimate of the relevance of each search-hit. Note that the source object contains only metadata, rather than a document’s entire contents: this is because the contents, if and when required, can more rapidly be retrieved from Couchbase itself; using the document ID that is the value of the_idfield.
Deployment Considerations
If you are working with an ElasticSearch cluster, it is recommended that you install the ElasticSearch Transport Plug-in on every node. At minimum, you can install it on a single node. The plug-in checks which nodes it’s installed on and reports the public host addresses of those back to Couchbase. XDCR is then directed to every node where the plug-in is installed.
Optionally, if your ElasticSearch cluster has separate data and client nodes, you can elect to install the ElasticSearch Transport Plug-in on just one set of nodes. By installing on the data nodes only, you can reduce the amount of routing that needs to be done. Alternatively, installing the plug-in on only the client nodes will offload CPU from the data nodes.