Document Expiry and Archival
This example illustrates how to leverage Timers in the Eventing Service to perform an document archival, upon expiry.
Need for Document Expiry and Archival
When an existing document is about to expire, there needs to be a way to programatically create a new document before its archival.
Developing your Handler Code
Create a JavaScript Function that contains an OnUpdate handler. The handler listens to data-changes within a specified source bucket. When a document within the source bucket is above to get expired, the handler executes a routine stores the document in the target bucket.
In this example, the handler calls a timer routine, which executes a callback function, two minutes prior to any document’s established expiration. This function retrieves a specified value from the document, and stores it in a document of the same name, in a specified target bucket. The original document in the source bucket is not changed.
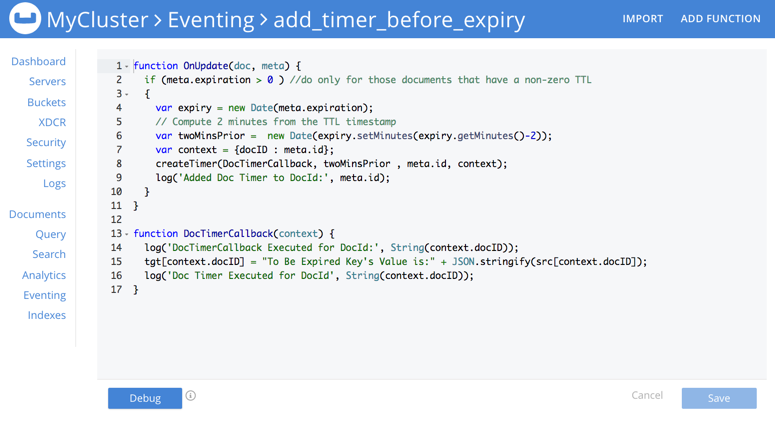
function OnUpdate(doc, meta) {
 if (meta.expiration > 0 ) //do only for those documents that have a non-zero TTL
     {
       var expiry = new Date(meta.expiration);
       // Compute 2 minutes from the TTL timestamp
        var twoMinsPrior = new Date(expiry.setMinutes(expiry.getMinutes()-2));
        var context = {docID : meta.id};
        createTimer(DocTimerCallback, twoMinsPrior , meta.id, context);
        log('Added Doc Timer to DocId:', meta.id);
      }
}
function DocTimerCallback(context)
     {
       log('DocTimerCallback Executed for DocId:', String(context.docID));
       tgt[context.docID] = "To Be Expired Key's Value is:" + JSON.stringify(src[context.docID]);
       log('Doc Timer Executed for DocId', String(context.docID));
     }
Prerequisites
Before you begin, you’ll need to ensure that:
-
The three buckets, metadata, target and source buckets, are created. See Creating Buckets.
-
A new document is created within the source bucket, and this document has its expiration, Time To Live (TTL), set to occur 10 minutes after the document’s creation.
-
Python script for this example is provided for reference. Couchbase SDK supports to creation or modification of the expiration time in a document.
from couchbase.cluster import Cluster
from couchbase.cluster import PasswordAuthenticator
import time
cluster = Cluster('couchbase://localhost:8091')
authenticator = PasswordAuthenticator('Administrator', 'password')
cluster.authenticate(authenticator)

cb = cluster.open_bucket('source')
cb.upsert('SampleDocument2', {'a_key': 'a_value'})
cb.touch('SampleDocument2', ttl=10*60)
The script imports a Couchbase cluster object, and authenticates it, using (for demonstration purposes) the Full Administrator username and password (the cluster is assumed to be accessible on localhost). The script then opens the existing source bucket, and inserts a new document, named SampleDocument2, whose body is {'a_key': 'a_value'}.
For information on installing the Couchbase Python SDK, refer to Start Using the SDK. For information on using the Couchbase Python SDK to establish bucket-expiration, refer to Document Operations.
Procedure
Proceed as follows:
-
Install the Couchbase SDK Python client and from the appropriate folder, start Python.
./python
-
On the Python prompt, enter the provided code.
>>> from couchbase.cluster import Cluster >>> from couchbase.cluster import PasswordAuthenticator >>> import time >>> cluster = Cluster('couchbase://localhost:8091') >>> authenticator = PasswordAuthenticator('Administrator', 'password') >>> cluster.authenticate(authenticator) >>> cb = cluster.open_bucket('source') >>> cb.upsert('SampleDocument2', {'a_key': 'a_value'}) OperationResult<rc=0x0, key='SampleDocument2', cas=0x1519ec8cdee90000> >>> cb.touch('SampleDocument2', ttl=10*60) OperationResult<rc=0x0, key='SampleDocument2', cas=0x1519ec8e686c0000> >>> -
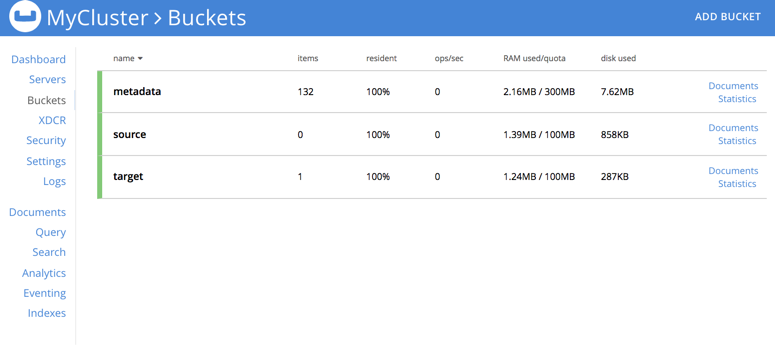
To verify bucket creation, access the Buckets screen from the Couchbase Web Console and click the Document tab of the Source bucket. The new document gets displayed.
-
[Optional Step] Click on a document’s id to view the metadata information.
-
From the Couchbase Web Console > Eventing page, click ADD FUNCTION, to add a new Function. The ADD FUNCTION dialog appears.
-
In the ADD FUNCTION dialog, for individual Function elements, provide the below information:
-
For the Source Bucket drop-down, select the source bucket option that was created for this purpose.
-
For the Metadata Bucket drop-down, select the metadata bucket option that was created for this purpose.
-
Enter add_timer_before_expiry as the name of the Function you are creating in the FunctionName text-box.
-
Enter text Function that adds timer before document expiry, in the Description text-box.
-
For the Settings option, use the default values.
-
For the Bindings option, add two bindings. For the first binding specify source as the name of the bucket, and specify src as its associated value. For the second binding, specify target as the name of the bucket, and specify tgt as the associated value.
-
-
After providing all the required information in the ADD FUNCTION dialog, click Next: Add Code. The add_timer_before_expiry dialog appears.
The add_timer_before_expiry dialog initially contains a placeholder code block. You will substitute your actual add_timer_before_expiry code in this block. -
Copy the sample Function handler code, and paste it in the placeholder code block of add_timer_before_expiry dialog.
-
After pasting, the screen appears as displayed below:
-
Click Save.
-
To return to the Eventing screen, click Eventing tab.
-
From the Eventing screen, click Deploy.
-
In the Confirm Deploy Function dialog, select Everything from the Feed boundary option.
-
Click Deploy. The function is deployed and starts running within a few seconds.
-
As a result, a new document — like the original, named SourceDocument2 — is created, with a value based on that of the original. After two minutes, check the documents within the source bucket: the original SourceDocument2 is no longer visible, having been removed at its defined expiration-time.
To summarize, using the timer construct, this example illustrated an easy way to move a document before its configured expiration time. Also, we used the Couchbase SDK Python client to insert the expiry time attribute to a document in the cluster.